If you are using certain Google Apps extensions (or the Enterprise version of Google Apps Login), you will need to set up a Service Account. This is an extra step on top of the regular setup (which you should have already followed based on the personalized instructions linked from your WordPress admin panel under Settings -> Google Apps Login – or you can see them here). The Service Account will allow your extension to make calls to Google APIs which require domain-wide permissions rather than just the permissions of the user who is currently logged in.
If in doubt about whether you need a Service Account or not, please just ignore for now, and you can come back later if you discover functionality is missing from your extension.
It will be easiest if you activate your Google Apps extension first before following the steps below – although you can choose to set up a Service Account before those extensions are activated if you want.
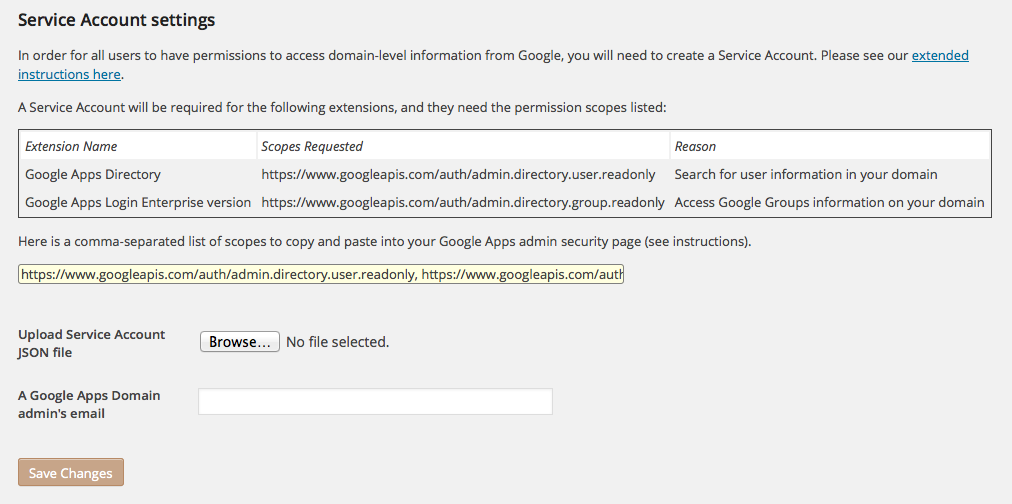
Go back to WordPress’ admin page, and select Settings -> Google Apps Login from the left-hand menu. You should be on the Main Setup tab, and towards the bottom look for the Service Account settings.
There’s quite a lot of information displayed there (you should see less if you only have one extension that requires a Service Account) – but don’t be overwhelmed… It’s simply listing the permissions that the extension(s) require, to allow you to make an informed decision about installing them.
There are a few steps we need to take in order to complete the plugin settings.
Create a Service Account in Google Developers Console
Go to Google Developers Console and return to the project you created when you first configured the Google Apps Login plugin. Return to APIs & Auth -> Credentials, where you will have previously created a ‘Client ID for web application’.
We need to create a new Service Account:
Please proceed with the Google flow to set the name to this account, and give it access to manage your account:
After the creation you will need to open the newly created Service account:
You can see a Keys menu item at the top. On that screen please click the “ADD KEY” > “Create new key” button and pick the JSON type (which is highlighted as “Recommended”). After the file creation – it will be automatically downloaded to your computer. It has an extension .json, and you should keep it safe for a future step in this process. You can click the ‘Okay, got it’ box that tells you to keep the file safe.
You should see your new Service Account beneath your existing ‘Client ID for web application’. It should display a Client ID which you will need to use later.
While you’re in the Google Developers Console, you may want to enable further APIs under APIs & Auth -> APIs, if you didn’t when you first set up the Google Apps Login plugin. Most extensions require the Admin SDK to be enabled.
Upload JSON key file and Settings to WordPress
Go back to WordPress and the Main Settings tab of Settings -> Google Apps Login.
Under Service Account settings, click the Browse or Select File button (depending on your browser) next to Upload Service Account JSON file. Locate the json file that you just downloaded from Google Developers Console.
While you’re there, beneath that Browse/Select button simply enter the email address of any user who has Administrative rights in your Google Apps domain. That is quite likely to be your own email address! Enter that in A Google Apps Domain admin’s email.
Save changes, and check for any problems – especially in uploading the JSON file. If the JSON file has been accepted, the details of your Service Account should be displayed in the Service Account settings area.
Granting rights for your Service Account to access Groups or Drive etc
Finally, as a Google Apps domain administrator, you need to go to your regular Google Apps Domain admin console at admin.google.com (not the Google Developers Console this time).
There please find a Security menu item in the left sidebar. If you don’t see it – click the “Show more” button to reveal all menu items.
There, go to Security -> Access and data control -> API controls. There is a “Domain-wide delegation” section, with a “MANAGE” link. After clicking this link, you will see a list of API Clients – which may be empty if you started anew. Click the “Add new” button:
You need to enter two fields: Client ID and API Scope.
The Client Name will be the Client ID of the Service Account you created earlier. E.g. 1234567890-bc1tud1cvim4c7q7sdg346q1l3scrhbcg.apps.googleusercontent.com. You can copy this from the Google Developers Console project page, from the Service Account section you created earlier.
In the box labeled “API Scopes (comma-delitmited)” copy and paste the scopes list you can see in the yellow box on the WordPress settings page:
- For the Enterprise Login plugin, the scopes required should be only:
https://www.googleapis.com/auth/admin.directory.group.readonly - The Google Drive Embedder Enterprise version requires the scope
https://www.googleapis.com/auth/drive - The Google Apps Directory extension requires the scope
https://www.googleapis.com/auth/admin.directory.user.readonly
If you have multiple extensions, the yellow box should contain a comma-separated list of all required scopes. For example, if you are using Google Drive Embedder Enterprise and Google Apps Login Enterprise, you will see the following that you need to copy and paste into the “API Scopes” box as one whole line:
https://www.googleapis.com/auth/admin.directory.group.readonly, https://www.googleapis.com/auth/drive
Click Authorize.
Conclusion
Now, your extensions should be able to use your Service Account to do their job. Any problems should be highlighted when those plugins attempt to do their jobs – so check any logs they may provide (e.g. Logs tab in settings for the Enterprise login plugin), or error messages they display on the screen.
Please do not hesitate to get in touch with us if you have any questions at all about Service Accounts or the Google Apps platform in general!

