Google Drive is a versatile way to store files and share with colleagues, while your intranet is clearer and better structured for sharing more focused information.
Wouldn’t it be great if your intranet could be used to control and structure the information your organization stores in Drive?
Our new Enterprise version of Google Drive Embedder integrates Drive much more closely with your WordPress intranet, essentially allowing each page or post on your intranet to host its own file attachments, completely backed by Drive.
This means you no longer need to manage Drive and your Intranet as two completely separate document sharing systems!
Getting Started
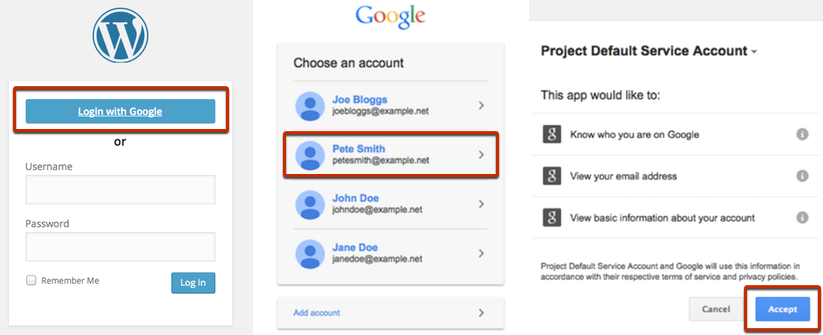
To get the full benefit you will need to be using version 2.5.2+ of the Google Apps Login plugin.
Deactivate any existing Google Drive Embedder plugin, and install and activate the Enterprise version by uploading the ZIP you should have been given when you purchased the product. To upload, go to your WordPress admin’s Plugins -> Add New page, then Upload.
You don’t need to do any more setup until we get to Controlled Folders or Page/Post Attachments in a bit.
New Folder Styles
Drive Embedder Enterprise has all the features of the premium and basic versions, plus much more advanced folder embedding. This starts with much neater styling. Instead of embedding folders as iframes, they are built directly into your WordPress pages, meaning you can click into subfolders and preview files without leaving your website.
There are three new types of embedded Drive folders:
- Quick Folders – just like the premium/basic version, you can use our dialog box to locate your folder and drop straight into your post or page, automatically using the new styling and interactive functionality.
- Controlled Folders – only available for admins to register by default, you can select a Drive folder to embed in your post/page with extra control over which WordPress users can interact with it. You can allow all users to view the folder and upload their own files – even without a Drive account; you can defer to the sharing settings for that folder in the user’s Drive account; or you can completely hide the folder or allow different permissions based on their WordPress role.
- Attachment Folders – every page and post can effectively have its own ‘controlled folder’ automatically created and inserted at the bottom of the page for users to view or share files. These auto-created folders are built in a hierarchy within your Google Drive, so files uploaded are instantly part of your Drive collection too. And since Drive files can have multiple parent folders, you can even go the other way round – from Drive, choose a file and instantly attach it to a page/post in your intranet simply by moving it to the relevant folder in the hierarchy!
Try out this example folder:
Quick Folders
When editing a page/post, you should see an Add Google File button (same as for the premium and basic Drive Embedder versions). Click it to see the dialog box, and locate a folder you want to embed. The default will be a Quick Folder anyway, but you can confirm this by opening up Options and seeing that the first option is selected – Require user to sign in to Drive.

When anyone views the post, they should see (after clicking Authorize if prompted), a new style folder! It should inherit styles from your WordPress theme, and you can style it further using your own CSS.

The other options that were available in the dialog box when you first selected the folder can customize the behavior.
Show Browse button for file uploads will add a browse button to the bottom of the folder prompting users to select their own files to upload to the Quick Folder. Whether or not that browse button is present, users can always attempt to drag-and-drop files into the folder. The upload will only succeed if their Drive account has permissions to write to that folder.
Show trail of subfolder hierarchy – if checked will show a small ‘breadcrumb’ trail of your history if you click into subfolders to view. You can click on a folder name to jump back to an earlier point in the hierarchy. Without breadcrumbs, you will only be able to ‘Go back’ one step at a time.
Controlled Folders
To make full use of Controlled Folders, you will first need to ensure you have a Service Account configured in Google Apps Login settings – see here for instructions.
Controlled Folders are Drive folders specially registered with Drive Embedder so that it can control who can view or make changes on behalf of the Service Account owner. Only WordPress administrators should be allowed to register them (or you can give the ‘manage_control_folders’ capability to other roles if you like).
Click Add Google File when editing a page/post and locate a Drive folder again. Select Embed, and then click Options…

Choose Register a Controlled Folder, and (after we’ve explained more about them) pick some permissions if necessary.
Different permissions can be applied to different types of user – Logged-in Users and Visitors (who are not logged in) are the groups you will see by default. You can also click Add Role to specify permissions to apply to users in specific WordPress roles.
Permissions dictate what a user/viewer can do with your folder. Initially, all will be set to ‘Default’ which means that the actual permission will be specified in some site-wide global settings (we will show how to set these later).
The basic options (beyond Default to defer to the global settings) are Always, Drive, and Never. And these can be specified for each functionality ‘View’ existing files and ‘Upload’ new files.
- Always means that users will be able to perform that action by using the Service Account – meaning they don’t even need to have a Google account themselves at all! This way you can allow users to view folders (and even upload files) to a folder that they wouldn’t otherwise have permissions to access at all.
- Drive will defer to the permissions of their Google Drive account, requiring them to e.g. login to Google to view your folder – and of course only be able to see files if they have been given access in Drive itself
- Never – means they won’t be given the opportunity to perform the action at all, via the Service Account or even via their Drive account. However, please note that if they do actually have permission to e.g. view or upload to the Drive folder directly, then they could always just go to Drive to perform the action there instead.
 When you click Insert File a Controlled Folder will be registered and inserted into the post. You can change the permissions from your WordPress Admin panel – look for Controlled Folders in your Dashboard, and you will see a list of all registered Controlled Folders. You can click in to edit permissions for the folder if you didn’t set them as desired when first inserting it into the post.
Attachment Folders
It is also possible to have Drive folders auto-created for each page/post and appended to the bottom of the page. These can act in similar ways to controlled folders, but are associated automatically with the post (or page), and are created in Drive in a special hierarchy.
To get started with Attachment Folders, we will need to visit the Drive Embedder plugin settings.
Drive Embedder settings
In your admin panel, go to Settings -> Google Drive Embedder.
Setup
To initialize the ‘Drive hierarchy’ you need to create or choose a ‘base folder’ which should be at the top level of your Drive account. In the Setup tab, you should have the opportunity to either create a new Drive folder, or pick an existing top-level Drive folder.

Click Save Changes to actually create or pick the folder, and then you should see that folder active as your ‘base folder’ – like this:

Folder Controls
Click the Folder Controls tab.

Check both Auto-create attachments folder on Pages and Auto-create attachments folder on Posts.
The permissions section allows you to specify the global site-wide permissions for Controlled Folders and Attachment Folders. These are what ‘default’ referred to when you created Controlled Folders.
To start with, all users will be required to use their Drive account to view or upload to folders. That means you may need to ensure your users have appropriate Drive sharing settings to the base folder you set up a minute ago. Or you can use Always and Never just as you could for Controlled Folders – Always uses the Service Account for an action (i.e. view or upload) regardless of whether that user has a Drive account or not.
If you check Allow page/post authors to override these auto-creation settings or Allow page/post authors to override attachment folder permissions then page/post authors will be able to override the relevant settings here by using a similar settings panel beneath the edit screen of a page/post. If you are a WordPress admin then you will always be able to see those override settings anyway.
Now, go to a page or post and you should see a Drive Attachment section at the bottom – where your users can share files with each other (if they have permissions, of course).

Try dragging a file over that section and see if it will upload for you. Then go to the folder in Drive and see the file there.
The great thing about Drive is that files can be in multiple folders at once. So files stored elsewhere in Drive can also be attached to the WordPress folder’s hierarchy and appear at the bottom of relevant pages.
Embedded Folder Shortcodes
Here are some options for shortcodes:
cfid=”<integer>”: id of a registered controlled folder.
id=”<string>”: Google Drive id of a Drive folder.
(Either cfid or id must be present.)
columns=”title,owner,lastmodified,size”: specify which columns to display, and in which order. List should be comma-separated and can include any of title, owner, lastmodified, size. The File Size (‘size’) is a column that is not displayed at all by default.
sort=”[-]<column name>”: specify which column to sort initially. Can use only one of the available column names in ‘columns’ parameter above (title, owner, lastmodified, size), optionally prefixed by a “-” to specify descending order. e.g. sort=”title” to sort in order of file titles; sort=”-lastmodified” to sort in descending order of date (most recent first).
breadcrumbs=”yes|no”: yes to enable a trail of folder names as you dive deeper into sub-folders – you can click the name of an earlier folder to jump back up the tree; no to disable those folder names, and just have a ‘go back’ button as you dive deeper.
maxresults=”<integer>”: to display only the specified number of files in the folder to start with; more can be loaded using a “more…” button.
subfolders=”yes|no”: yes to list subfolders and allow the user to drill down into them; no just to ignore them and miss them off the folder list
showupload=”yes|no”: whether to add a browse button to the bottom of the folder. If upload permissions are ‘Never’ then this will not show in any event. If not present, then users with the correct permissions will still be able to drag-and-drop files.
width|height=”<integer>[%|px]”: dimensions of either width or height (or both); optional – if omitted folder will just fill as much space as required (or allowed by your CSS styles).
attachmentstitle=”yes|no”: if yes, displays “Drive Attachments” at the top of the folder area, as is mandatory for Attachment Folders.
border=”yes|no”: if yes, displays a border around the embedded folder.
preview=”none|google|download|both” (default = “both”): Specifies which file types should open in a preview lightbox. None means no files should preview, and therefore native Google file types will open in a new tab, and non-native ‘downloadable’ files will download to the user’s computer. “google” means that native Google docs will preview, while “download” means that only non-Google file types will preview. “both” means all file types will open in the preview lightbox when clicked.
Folders will largely inherit styling from your theme, and you will be able to override styles directly in your CSS if desired.
Feedback and Support
Please email us if you have any support questions or feedback.