Read more and purchase: Google Apps Login.
Introduction
This video will show you our WordPress plugin called Google Apps Login – we call it Gloggin for short.
We will show you how it works on your site and how easy it is to install.
Even for individual users, it can be frustrating to remember passwords and login details for many different sites; and especially for larger organizations – which might build their corporate intranet on WordPress – it can be an administrative headache to ensure all your users have access, and that those who shouldn’t have access are barred.
So, where does Google Apps Login for WordPress fit in?
At its simplest, Gloggin allows users to log into your WordPress site using Google to securely authenticate their account. Simply click here and connect securely with Google. There is no need to remember a separate WordPress username and password.
The basic plugin version is free from the WordPress directory, and there are also premium and enterprise versions created to make life easier for admins of Google Apps and WordPress.
So Glogin is not just a ‘social login’ plugin. It’s very specific to Google Apps, and really focuses on easy account creation and management for admins, as well as making life easy for your employees who use the website every day.
Installation
It’s really easy to set up the plugin in WordPress, so let’s walk you through it. We’re setting up the premium version here, but the free verson is very similar so just follow along.
This is the Plugins page in your WordPress admin area. Click Add New.
If you’ve purchased the premium version you’ll have been given a ZIP file which you should upload here. To install the free version, click Search and look for “Google Apps Login”.
Once you’ve activated the plugin, you’ll be prompted to configure it. You can click on the warning, or go to Settings, Google Apps Login.
Basically, we need to register our WordPress site with Google, and in turn Google will give us two codes that we need to enter into these boxes here.
You will need to click the link here to see your ‘personalized instructions’, because that will give you some information that you need to supply to Google.
So let’s click on the link.
The two pieces of information we need to give to Google are these web addresses – which are your main web address and the URL to your WordPress login page.
The place we need to register with Google is in their ‘Cloud Console’. We can reach that through this link here.
In the Cloud Console we need to create a new project. Any name is fine, and you can leave the ID as it is.
Click OK.
Now, if this is your first project you may be required to accept a verification phone call or SMS from Google, so just follow the instructions if that happens.
Then within the project – under APIs & Auth, then Credentials – we need to Create new Client ID. Select Web Application as the Platform type.
Now this is where we need to copy and paste the info from our personalized instructions.
We go back there, and copy the Authorized Javascript origin, pasting it into the Javascript origin box here.
Then we go back and get the Authorized redirect URI.
Click Create Client ID.
Now we need to turn to this section – Client ID for Web Application – to obtain the codes we need to supply to WordPress. We’re not looking at the Compute and App Engine section at the top – it’s the new Client ID for Web Application that we just created.
So we copy this client ID, then go back to WordPress and Settings, Google Apps Login, and paste it into client ID here.
And then we go back for the client secret. And paste it here. We can click save at this point.
Final Installation and SSO Demo
Just to finish off in Google Cloud Console, we may need to enable some specific APIs under APIs & Auth, then APIs. If you’re planning to use our Google Drive Embedder extension then you will need to enable Drive API and Calendar API. If you’re using the enterprise version of Google Apps Login, or plan to try our Google Apps Directory widget, enable the Admin SDK.
Finally, we go to Consent Screen. We can smarten things up for your users here by entering your company or site name where it says Product name. If you like, you can also add your logo and other details to customize what users see when they first login.
Back in WordPress, we’ve already saved our two codes. There will be more options to choose later if needed, and the enterprise version – and certain extension plugins – will require you to complete this Service Account section, which will have a link to its own instructions. But at this stage we can try out the single sign on functionality.
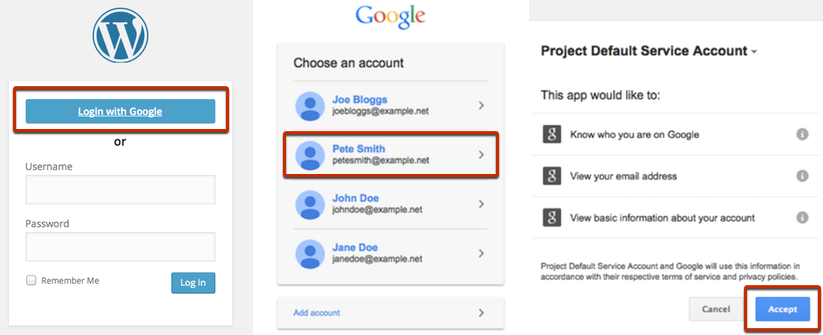
If I log out of WordPress, I can now see the Login with Google button. The first time I click that I need to approve permissions for our newly registered project, and then – if I have a WordPress account with the same email address as my Google account – I will be logged straight in!
Professional Versions
Now let’s look at the extra security that the premium and enterprise versions will give your organization.
Glogin is designed for companies that already use Google Apps for all their employee email accounts. Those companies can completely forget about WordPress user management, delegating it completely to Google Apps. So instead of having to create new WordPress accounts for every new employee – and remember to disable them when employees leave – Glogin can take care of all of that, giving you peace of mind that only authorized employees have access to your WordPress site.
Especially if you’re building a corporate intranet, then aside from saving time and increasing security for you as an administrator, it is important that employees have easy access to the intranet as soon as they join – otherwise you may find that they fail to fully engage with it.
As it stands, if I try to login with a Google account that doesn’t already correspond to an existing WordPress account, it will tell me I don’t have an account.
So to complete the setup for the premium version of the plugin, we return to the Glogin settings page in WordPress, and click the Domain Control tab.
Here, we enter our company’s Google Apps domain name. If you happen to have more than one domain where users may have accounts, enter them with a space inbetween.
Then, we can check ‘Auto create new users on my domain’, and select a Default WordPress role.
Now, if I try to login with Google using the account that didn’t have access to WordPress before, Glogin will automatically create an account in WordPress, with the role that we specified. And it fills in my name based on my Google profile, so everything is set up ready to go.
Professional Extra Settings
Now, to really tie your Google Apps domains to your WordPress accounts, there are some more useful settings.
You can ‘Disable WordPress username/password login for my domain’, which means that anyone from the Google Apps domain you specified above who tries to use a native WordPress login – instead of Google login – to access WordPress will not be allowed. This means that staff who have left will not be able to login provided their Google accounts are suspended.
If most users of your site will use Google login, then you can check this next box to hide the WordPress username and password boxes completely. That really helps guide your staff to the Google login, therefore always taking care of WordPress user management so you don’t have to!
In the premium version, all new WordPress accounts will have the role you specified. However, after the accounts are created, an admin will be able to go in and adjust individual roles if necessary.
Enterprise
If you need more granular control over WordPress roles-and-access within your staff members, as well as full logging and reporting of the automatic account provisioning, take a look at the Enterprise version of Glogin.
With enterprise, you can specify Google Groups, and corresponding WordPress roles. When new users are created, Glogin will check to see if they are members of any of the Google Groups listed. And if so, will set their WordPress role to the level you specified in the mapping for that group.
So you might have a Google Group called developers @ your company.com, and you want all members of that group to be Admins in WordPress. Then members of a marketing group might all be WordPress Editors, while everyone else in your company should just be a Subscriber.
If you check the box called ‘check and reset roles on every login’ then every time any user logs in with Google, Glogin will see if they are still members of the appropriate Group, and adjust roles accordingly.
You can also enter an individual email addresses if you need a user to undertake a specific role, but it isn’t worth creating a separate Google Group for them.
Conclusion
So this concludes our introduction to Google Apps Login for WordPress. Please email us if you have any questions at all. You can purchase an appropriate license for the premium or enterprise versions from our website: wp-glogin.com.
There is much more to Glogin than we’ve covered in this video. Your WordPress developer can extend the plugin to add their own Google functionality, without requiring their own configuration which means that your WordPress site appears as one ‘application’ to Google in terms of permissions. This makes development easier, and your site more secure.
You might also like to try our own extension plugin – Google Drive Embedder – which gives you easy access to your Google Drive when you are writing posts and pages in WordPress, so you can embed Drive documents.
Find out more about this and other products on our website, wp-glogin.com!
Read more and purchase: Google Apps Login