Welcome, and thanks for downloading the Google Apps Plugin for WordPress. We presume you have installed one of the Free, Premium, or Enterprise versions of the Google Apps Login plugin and are now attempting to configure the plugin from the ‘Google Apps Login’ page under ‘Settings’ in your WordPress admin area.
We will guide you through registering your site with Google Developers Console (which you will need to do unless the plugin has already been able to pull the settings through from the free version of the plugin while upgrading to Premium/Enterprise). Please note that your version of the Google Developers Console may vary slightly.
Configuration
Within WordPress, start from the page Settings -> Google Apps Login – which is where you probably followed the link to this instructions page.
Step 1
When you click on the ‘Google Apps login’ button, you will reach the Google Apps Login setup page. Here you will find two boxes under the Main setup option, and these will be titled ‘Client ID’ and ‘Client Secret.’
There is also a link at the top of the page to take you to the personalized instructions page. Click on the link.

Step 2
You will now see the Configurations heading. Click on the link given below the heading. This will take you to the cloud console page, where you must register with Google. If you cannot access the link, please click on this link https://console.developers.google.com/ (link will open in a new window).
The Google Workspace domain admin needs to go to the cloud console page. If you are not the domain admin, you may still be able to use the console if you use your regular Gmail account instead of Google Workspace.

Step 3
In the Google Developers’ Console, click on the ‘New Project’ button (add the project name you want and leave the project ID as it is).
If this is the first project you are creating, you may be required to accept a verification SMS or phone call from Google. Follow the instructions to complete this verification process. For more clarification, please see the screenshot given below.
When you click on the dropdown menu, you will get a popup screen to find an option to create a new project on the top right corner. Click on ‘New Project.’ For more clarification, please see the screenshot given below.

Step 4
When you click on the new project link, you will be redirected to the new page. Please write your project name, select the organization hierarchy, and click on create. For more clarification, please see the screenshot given below.

Step 5
Once you click on the ‘create’ button, Google Console starts creating a project for you. Please wait until the Google console completes the process. You will receive a notification, as shown in the screenshot given below.

Click on the project creation notification or select an existing project from the Project drop-down menu. You will then be redirected to the dashboard screen of the selected project.

Step 6
Now click on the menu icon from the top left corner and hover your mouse on APIs & Services. You’ll get the OAuth consent screen menu item. When you click on the menu item, the screen looks like the screenshot given below.
Please select the appropriate option as per your requirement and then click on the create button.

Step 7
Write the Application Name and mention all your domains underneath the title ‘authorized domains’ in the form. This will allow you to select the domains that you are going to use this application with. For more clarification, please see the screenshot given below.

Step 8
After saving this form, please click on the credentials menu to find ‘Create Credentials’ on the top. Click on it and select the option ‘OAuth Client ID.’ For more clarification, please see the screenshot.

Step 9
Once you select the OAuth client ID, you will be redirected to the page to choose the application type. This is where you’ll choose the platform you are going to use this OAuth 2.0 protocol. Please select the “Web application” option. Once done, you will get a form where you can write the OAuth application name. You will also have to define the Authorized JavaScript origins and Authorized redirect URLs. When done, click on the “Create” button.
Note: Please write your OAuth Origin and OAuth Redirect URL like this:
OAuth Javascript Origins URL: {Your site URL}
OAuth Redirect URL: {Your site URL}/wp-login.php
Step 10
Once you’ve created the OAuth application process, a popup will notify you to find your Client ID and your Client Secret Key.
Step 11
You must copy and paste these values (Client ID and Client Secret Key) into the boxes back on the WordPress plugin settings screen – i.e., back in your WordPress admin, under Settings -> Google Apps Login.
Step 12 (optional)
If you plan to use our Google Drive Embedder extension plugin, you will also need to enable the ‘Drive API’ and ‘Calendar API.’
Navigate to APIs & AUTH in the Google Developers Console, and search for the Drive API and the Calendar API from the library. Then click on the ‘OFF’ button in front of Drive API and Calendar API. This will open a window, and here you can check the box and click on the ‘Accept’ button.
If you use the Enterprise version of Google Apps Login, you will also need to enable Admin SDK.

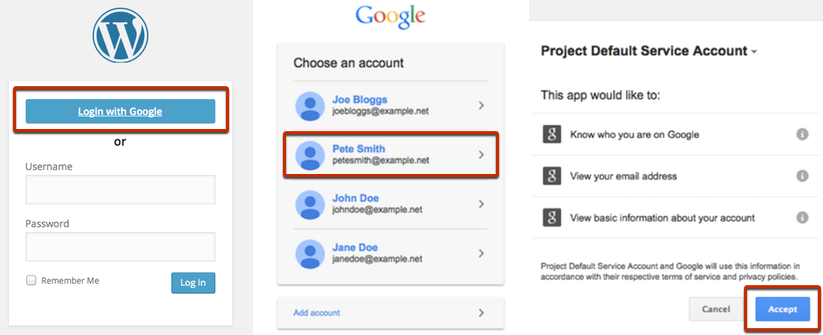
All done! Save the settings in your WordPress admin, then try logging out. You should now see a ‘Sign in with Google’ button on your WordPress login page.
For certain extensions (Google Apps Directory or the Enterprise version of Google Apps Login), you may also need to follow the instructions to set up a service account. If in doubt, please ignore this for now.
Next Steps
If you have purchased the Premium or Enterprise version of the plugin, please navigate to the Premium Setup instructions to understand how to use the premium/enterprise features that automatically restrict access to users on your own Google Workspace domain, including auto-creation of users.
You can also learn about the (free/premium/enterprise) plugin’s Advanced Options and Multisite capabilities.