If you are using certain Google Apps extensions (or the Enterprise version of Google Apps Login), you will need to set up a Service Account. This is an extra step on top of the regular setup (which you should have already followed based on the personalized instructions linked from your WordPress admin panel under Settings -> Google Apps Login – or you can see them here). The Service Account will allow your extension to make calls to Google APIs which require domain-wide permissions rather than just the permissions of the user who is currently logged in.
If in doubt about whether you need a Service Account or not, please just ignore for now, and you can come back later if you discover functionality is missing from your extension.
Please note that Service Account functionality appears to be no longer available for free gmail.com accounts – upgrading to a G Suite account is required.
It will be easiest if you activate your Google Apps extension first before following the steps below – although you can choose to set up a Service Account before those extensions are activated if you want.
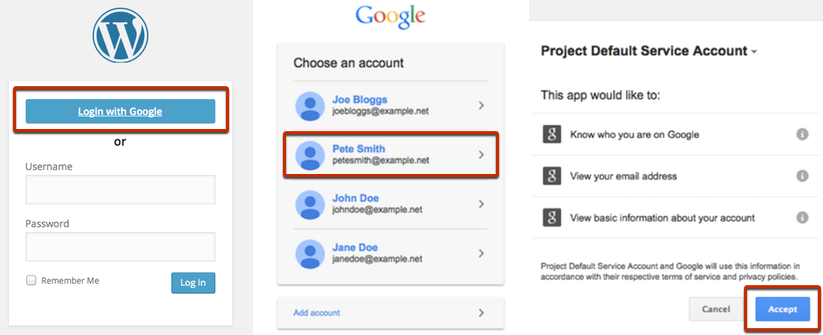
Go to the WordPress admin page and select Settings (appearing on your left side of the screen) Select Google Apps Login from the settings menu. Under the Google Apps Login setup section, the main set up tab will be selected by default. For more clarification please refer to the screenshot given below.

This is the screen where you need to setup your service account.
Please Click on the Google Developers Console.
Select the project you created when you first configured the Google Apps Login plugin from the list.
Once you have selected the project, you will have to select IAM & Admin from the top-left menu. Under IAM & Admin, select Service Accounts. Click the Create service account button at the top.

When you click on Service accounts you will get a screen to create a new service account please click on create a service account from the top menu.
![]()
You will get a form to create a service account. Enter the service account name of your choice The “Service account ID” would be auto-generated once you create a service account name. You can leave the Service account ID as it is or you can change as per your choice.

Once you click on create, it will prompt you to enter roles which is an optional choice to enter. But if you want to configure then you can configure the roles as given below.


Once you are done with the configuration role, click on the continue. In the next screen, please enter your Gsuite administrator email account in both input boxes. Example shown given below.

After entering the email address please click on Create key to generate a pop-up, select the JSON option in the pop-up. For clarification, look at the screenshot below.

After selecting JSON, please click on the create button. Your service account will be created and a JSON file will be downloaded. Please check if the extensions Admin SDK, google drive and google calendar API is enabled or not.
To enable APIs, click on the top menu. Select API & Services. Select Library.

After selecting Library, you will be redirected to a screen where you will be able to search for admin SDK, Google Drive, and Google Calendar API and enable all the three APIs.
You need to set up the service account created into your WordPress plugin. Please go to your WordPress admin dashboard to upload the JSON key file.
Go back to WordPress and the Main Settings tab of Settings -> Google Apps Login.
Under Service Account settings, click the Browse/Choose file button to upload service account JSON file

Save changes, if the JSON file has been accepted, the details of your Service Account should be displayed in the Service Account settings area. The information shown should include the ‘Service Account Client ID / Name’ – in a yellow box.
Granting rights for your Service Account to access Groups or Drive etc
Now it time to Grant rights for your Service Account to access Groups or Drive etc.
Finally, as a Google Apps domain administrator, you need to go to your regular Google Apps Domain admin console at admin.google.com (not the Google Developers Console this time).
Please login with Gsuit admin login credentials.
Click on left side menu you will see the list of menus mouse hover on Security you will see the submenu click on API Controls. For more clarification please see the screenshot.
 - WP-G")
 - WP-G")
Once you click on API Controls you will be redirected API controls page scroll down and find Domain wide delegation you will see link named “Manage domain wide delegation”.
 - WP-G")
You will be redirected to the page where you can enter Client ID and API scopes by clicking on Add button. For more clarification please see the screenshot given below.
 - WP-G")
The Client ID of the Service Account you created earlier. E.g. 1234567890123456. You can copy this from the yellow box labeled ‘Service Account Client ID / Name’ in your WordPress settings page. (You would also be able to look it up from the Google Developers Console project page, within the Service Account you created earlier.)
In the box labeled ‘One or More API Scopes,’ copy and paste the scopes list you can see in the other yellow box in the WordPress settings page. For the Enterprise Login plugin, the scopes required should be:
https://www.googleapis.com/auth/admin.directory.group.readonly, https://www.googleapis.com/auth/admin.directory.user.readonly.
The Google Drive Embedder Enterprise version requires the scope https://www.googleapis.com/auth/drive.
The Google Apps Directory extension requires the scope https://www.googleapis.com/auth/admin.directory.user.readonly.
If you have multiple extensions, the yellow box should contain a comma-separated list of all required scopes. For example, if you are using Google Drive Embedder Enterprise and Google Apps Login Enterprise, you will see the following that you need to copy and paste into the ‘One or More API Scopes’ box as one whole line: like given example below
Example : https://www.googleapis.com/auth/admin.directory.group.readonly, https://www.googleapis.com/auth/admin.directory.user.readonly, https://www.googleapis.com/auth/drive
After all settings are done, please click the Authorize button.
Conclusion
Now, your extensions should be able to use your Service Account to do their job. Any problems should be highlighted when those plugins attempt to do their jobs – so check any logs they may provide (e.g. Logs tab in settings for the Enterprise login plugin), or error messages they display on the screen.
Please do not hesitate to get in touch with us if you have any questions at all about Service Accounts or the Google Apps platform in general! Email us.