If a folder with the following icon appears in the menu (folder with arrow) instead of the normal folder (folder without arrow), this is a Google Drive shortcut (new 2022). Folder shortcuts are not accessible through the Google Drive Embedder. To resolve this, the owner of the Google Drive will need to access their Google Workspace administration settings and opt out of the auto shortcuts feature. The folder shortcuts will then be replace with the actual folder link.
Setup (all versions)
Welcome, and thanks for downloading the Google Apps Plugin for WordPress. We presume you have installed one of the Free, Premium, or Enterprise versions of the Google Apps Login plugin and are now attempting to configure the plugin from the ‘Google Apps Login’ page under ‘Settings’ in your WordPress admin area.
We will guide you through registering your site with Google Developers Console (which you will need to do unless the plugin has already been able to pull the settings through from the free version of the plugin while upgrading to Premium/Enterprise). Please note that your version of the Google Developers Console may vary slightly.
Configuration
Within WordPress, start from the page Settings -> Google Apps Login – which is where you probably followed the link to this instructions page.
Step 1
When you click on the ‘Google Apps login’ button, you will reach the Google Apps Login setup page. Here you will find two boxes under the Main setup option, and these will be titled ‘Client ID’ and ‘Client Secret.’
There is also a link at the top of the page to take you to the personalized instructions page. Click on the link.
Step 2
You will now see the Configurations heading. Click on the link given below the heading. This will take you to the cloud console page, where you must register with Google. If you cannot access the link, please click on this link https://console.developers.google.com/ (link will open in a new window).
The Google Workspace domain admin needs to go to the cloud console page. If you are not the domain admin, you may still be able to use the console if you use your regular Gmail account instead of Google Workspace.
Step 3
In the Google Developers’ Console, click on the ‘New Project’ button (add the project name you want and leave the project ID as it is).
If this is the first project you are creating, you may be required to accept a verification SMS or phone call from Google. Follow the instructions to complete this verification process. For more clarification, please see the screenshot given below.
When you click on the dropdown menu, you will get a popup screen to find an option to create a new project on the top right corner. Click on ‘New Project.’ For more clarification, please see the screenshot given below.
Step 4
When you click on the new project link, you will be redirected to the new page. Please write your project name, select the organization hierarchy, and click on create. For more clarification, please see the screenshot given below.
Step 5
Once you click on the ‘create’ button, Google Console starts creating a project for you. Please wait until the Google console completes the process. You will receive a notification, as shown in the screenshot given below.
Click on the project creation notification or select an existing project from the Project drop-down menu. You will then be redirected to the dashboard screen of the selected project.
Step 6
Now click on the menu icon from the top left corner and hover your mouse on APIs & Services. You’ll get the OAuth consent screen menu item. When you click on the menu item, the screen looks like the screenshot given below.
Please select the appropriate option as per your requirement and then click on the create button.
Step 7
Write the Application Name and mention all your domains underneath the title ‘authorized domains’ in the form. This will allow you to select the domains that you are going to use this application with. For more clarification, please see the screenshot given below.
Step 8
After saving this form, please click on the credentials menu to find ‘Create Credentials’ on the top. Click on it and select the option ‘OAuth Client ID.’ For more clarification, please see the screenshot.
Step 9
Once you select the OAuth client ID, you will be redirected to the page to choose the application type. This is where you’ll choose the platform you are going to use this OAuth 2.0 protocol. Please select the “Web application” option. Once done, you will get a form where you can write the OAuth application name. You will also have to define the Authorized JavaScript origins and Authorized redirect URLs. When done, click on the “Create” button.
Note: Please write your OAuth Origin and OAuth Redirect URL like this:
OAuth Javascript Origins URL: {Your site URL}
OAuth Redirect URL: {Your site URL}/wp-login.php
Step 10
Once you’ve created the OAuth application process, a popup will notify you to find your Client ID and your Client Secret Key.
Step 11
You must copy and paste these values (Client ID and Client Secret Key) into the boxes back on the WordPress plugin settings screen – i.e., back in your WordPress admin, under Settings -> Google Apps Login.
Step 12 (optional)
If you plan to use our Google Drive Embedder extension plugin, you will also need to enable the ‘Drive API’ and ‘Calendar API.’
Navigate to APIs & AUTH in the Google Developers Console, and search for the Drive API and the Calendar API from the library. Then click on the ‘OFF’ button in front of Drive API and Calendar API. This will open a window, and here you can check the box and click on the ‘Accept’ button.
If you use the Enterprise version of Google Apps Login, you will also need to enable Admin SDK.
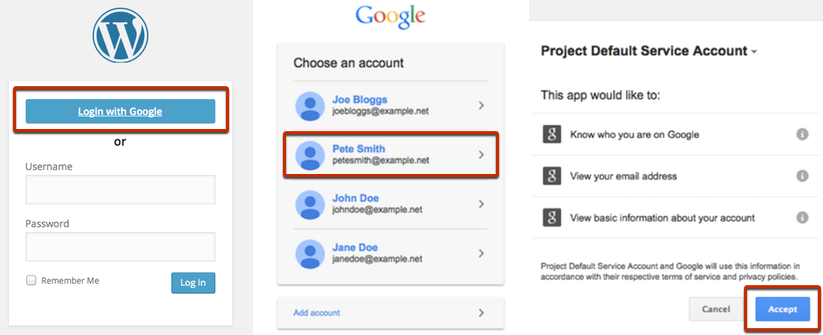
All done! Save the settings in your WordPress admin, then try logging out. You should now see a ‘Sign in with Google’ button on your WordPress login page.
For certain extensions (Google Apps Directory or the Enterprise version of Google Apps Login), you may also need to follow the instructions to set up a service account. If in doubt, please ignore this for now.
Next Steps
If you have purchased the Premium or Enterprise version of the plugin, please navigate to the Premium Setup instructions to understand how to use the premium/enterprise features that automatically restrict access to users on your own Google Workspace domain, including auto-creation of users.
You can also learn about the (free/premium/enterprise) plugin’s Advanced Options and Multisite capabilities.
Login button
Adding the ‘Login with Google’ button to any page on your site
The easiest way to add a Login with Google button anywhere on your site is to add the following link anywhere you would like a customer to be able to “Login with Google”:
/wp-login.php?gaautologin=true
For example, in HTML:
<a href="/wp-login.php?gaautologin=true">Login with Google</a>
This would have to leave the current page in order to go through the Google login flow. However, depending on how your site is set up, this may not land on the page you expect after Google has authenticated. To control the page it returns to after authentication, try adding a redirect_to parameter as follows in this example:
/wp-login.php?gaautologin=true&redirect_to=http://mysite.com/comebackhere/
(the redirect_to should really be URL-encoded, but it will often work if you can’t do this)
Hiding the ‘Login with Google’ button from the wp-login.php page
You may have only installed Google Apps Login in order to use an extension plugin such as Google Drive Embedder, but not actually want your users to see the ‘Login with Google’ button on your login page (nor be able to use its functionality).
There is no native way to turn off the Login functionality, but it should be possible to add some CSS code to your Theme to override the styles and hide the login button etc.
You could add the following CSS to your child theme’s style.css file:
form#loginform p.galogin, form#loginform p.galogin-powered, form#loginform p.galogin-or, form#loginform h3.galogin-or { display: none !important; }
The above is a suggestion based on the default WordPress configuration, but hopefully you can adapt to match your theme if needed – or your web designer can do this for you.
If your theme’s styles aren’t pulling through to the login page, you might need to write some code to inject the CSS directly, perhaps from your Theme’s functions.php file:
function my_login_styles() { ?> <style type="text/css"> form#loginform p.galogin, form#loginform p.galogin-powered, form#loginform p.galogin-or, form#loginform h3.galogin-or { display: none !important; } </style> <?php } add_action('login_enqueue_scripts', 'my_login_styles');
Please remember to keep a backup copy of functions.php since entering the code incorrectly could break your site.
Directory Hooks
Google Apps Directory Hooks
Filters: gad_extract_user_data and gad_extra_output_fields
These hooks allows you to add your own fields to the Google Apps Directory’s search output. For example, you could add the following code to your functions.php file of your Theme, adding phone numbers to the output (note phone is available by default in the Enterprise version):
add_filter('gad_extract_user_data', 'my_gad_extract_user_data', 10,2); function my_gad_extract_user_data($user_outdata, $u) { // $u contains data returned from Google $phones = $u->getPhones(); if (is_array($phones) && count($phones) > 0) { $phone = $phones[0]['value']; // Add extra custom data for this user $user_outdata['phone'] = 'Phone: '.$phone; } return $user_outdata; } add_filter('gad_extra_output_fields', 'my_gad_extra_output_fields', 10,1); // Tell javascript widget extra fields to pull from the array extracted above function my_gad_extra_output_fields($infields) { return 'phone,'.$infields; }
If the filter gad_extract_user_data returns null, the user in question will be completely removed from the results displayed.
To add columns to the google-apps-directory-table (Enterprise version), to show different types of phone number (e.g. work, mobile,… )
function my2_gad_extract_user_data($user_outdata, $u) { $phones = $u->getPhones(); if (is_array($phones)) { foreach ($phones as $phone) { if (isset($phone['value']) && isset($phone['type'])) { $user_outdata[ 'phone_'.$phone['type'] ] = $phone['value']; } } } return $user_outdata; } add_filter('gad_extract_user_data', 'my2_gad_extract_user_data', 10, 2);
You could then add e.g. columns=”phone_mobile” to your google-apps-directory-table shortcode.
Drive Hooks
Google Drive Embedder hooks
Filter: gde_gather_custom_properties
Available in Google Drive Embedder Enterprise plugin only.
The Drive Enterprise plugin applies this filter to allow your extension to add custom properties to Google Drive folders and files that you associate with your WordPress site.
For example, you could mark all auto-created folders with a special tag that you can use in Drive search calls elsewhere.
Params:
$custom_properties – Array of properties to add to file/folder, from other plugins, or null if none added yet.
$type – A string (either ‘root’, ‘post’, or ‘blog’) indicating where the folder/file is being embedded in your site. ‘root’ means the base folder is being created in the Settings page (this is a one-off); ‘blog’ means a multisite sub-blog is having its top-level folder created within your base folder hierarchy; ‘post’ means a folder/file is being attached to a post (or page etc) in your site.
$id – The blog_id or post_id of the relevant sub-blog (multisite only) or post. This parameter is null if $type equals ‘root’.
Return:
Array of properties to add to file/folder, adding your own properties, or null if no properties are to be added.
Each custom property is an associative array containing the keys: ‘key’, ‘value’, and (optionally) ‘visibility’. These correspond to the values required by the Drive API. Visibility defaults to PUBLIC, not PRIVATE.
Example:
function my_gde_gather_custom_properties($custom_properties, $type, $id) { return array_merge(is_null($custom_properties) ? array() : $custom_properties, Array( Array('key' => 'intranetfile', 'value' => $type, 'visibility' => 'PRIVATE') ) ); } add_filter('gde_gather_custom_properties', 'my_gde_gather_custom_properties', 10, 3 );
Hook: gde_after_do_create_folder (Enterprise only)
Available in Google Drive Embedder Enterprise plugin only.
The Drive Enterprise plugin fires this hook after an attachments folder is auto-created.
Params:
$id – the newly created Google Drive folder ID
$driveservice – an object for calling Drive API
$parent_folderid – Drive folder ID of the parent folder it was created within
$post_name – Name of the post/page of which the folder is an attachment (this name will also be the name of the folder in Drive)
$owner_email – User who should own the folder
$writer_email – Users who should have edit rights
$custom_properties – meta properties assigned to the Drive folder
See core/folders/drive_helper.php to further understand the context in which the hook is fired.
Hook: gde_attachment_folder_atts (Enterprise v3.8.6+ only)
Available in Google Drive Embedder Enterprise plugin only.
A filter to obtain the equivalent of folder shortcode parameters for an Attachment Folder.
Params:
$folderparams – PHP Array containing key/value pairs of the default shortcode params. You can add or modify entries before returning this array.
Return:
Array of shortcode params – $folderparams as provided as an input.
Example:
Change the columns that are displayed – removes author column compared to the default columns that you’d see without this filter:
function my_gde_attachment_folder_atts ($folderparams) { $folderparams['columns'] = 'title,lastmodified,size'; return $folderparams; } add_filter('gde_attachment_folder_atts', 'my_gde_attachment_folder_atts', 10, 1);
Hook: gde_shortcode_folder_atts (Enterprise v3.9.4+ only)
Available in Google Drive Embedder Enterprise plugin only.
A filter to obtain the equivalent of folder shortcode parameters for a folder shortcode. This works identically to the equivalent filter for attachment folders (gde_attachment_folder_atts), but applies instead to explicit google-drive-folder shortcodes.
Params:
$folderparams – PHP Array containing key/value pairs of the default shortcode params. You can add or modify entries before returning this array.
Return:
Array of shortcode params – $folderparams as provided as an input.
Example:
Regardless of the columns parameter that the page author might have added to the shortcode, ensure that every embedded folder only displays the title column. Apply this to attachment folders too using the gde_attachment_folder_atts filter:
function my_gde_folder_atts ($folderparams) { $folderparams['columns'] = 'title'; return $folderparams; } add_filter('gde_attachment_folder_atts', 'my_gde_folder_atts', 10, 1); add_filter('gde_shortcode_folder_atts', 'my_gde_folder_atts', 10, 1);
Hook: gde_toplevel_foldername_for_post (Enterprise v3.9.5+ only)
Available in Google Drive Embedder Enterprise plugin only.
A filter to insert extra top-level folders so you can better organize Attachment Folders within your base folder. This will only be called the first time the Attachment Folder is created for a particular post (or page or custom type). It will only be called again if the folder is ever recreated, e.g. if you switch to a different base folder in the plugin settings.
Params:
$foldername – The default suggested top-level folder.
$post – The WP_Post object of the post that is to have its corresponding Attachment Folder created.
Return:
String containing the suggested folder name – just return $foldername to avoid inserting an extra level of folder within the hierarchy.
Example:
To insert an extra ‘Articles’ folder to contain all custom posts if type ‘article’:
function my_gde_toplevel_foldername_for_post($foldername, $post) { if (isset($post->post_type) && $post->post_type == 'article') { return 'Articles'; } return $foldername; } add_filter('gde_toplevel_foldername_for_post', 'my_gde_toplevel_foldername_for_post', 10, 2);
Folder Javascript Hooks
Enterprise-style folder embeds also fire some Javascript events when certain things happen. See Folder JS Hooks.
Service Accounts
Service Accounts
As of Google Apps Login version 2.5, users can configure a Service Account which your extensions can access. The Google Apps Directory plugin is a free example plugin that takes advantage of this.
See gal_gather_serviceacct_reqs below. And here is some example code as to how you might obtain the Service Account object:
if (!function_exists('GoogleAppsLogin')) { die("Google Apps Login plugin needs to be activated and configured"); } try { $gal = GoogleAppsLogin(); $cred = $gal->get_Auth_AssertionCredentials( array('https://www.googleapis.com/auth/admin.directory.user.readonly')); $serviceclient = $gal->get_Google_Client(); $serviceclient->setAssertionCredentials($cred); // Include paths were set when client was created if (!class_exists('GoogleGAL_Service_Directory')) { require_once( 'Google/Service/Directory.php' ); } $userservice = new GoogleGAL_Service_Directory($serviceclient); $usersresult = $userservice->users->listUsers(Array('query' => $searchstr, 'customer' => 'my_customer')); $usersdata = $usersresult->getUsers();
Filter: gal_gather_serviceacct_reqs
The Login plugin applies this filter to allow your extension to instruct it to list extra Google domain-wide authorization scopes (permissions) when providing instructions for the user to configure the Service Account.
Params:
$reqs_array – Array of scope definitions from other plugins.
Return:
Array of scope definitions, adding your own scope definitions first if needed. Do not worry about potential duplicates – the plugin takes care of that.
The array element you should add is an array itself containing:
Your extension name in element 0, and another array in element 1.
That other array (in element 1) should be an associative array of Google API scopes mapping to plain English reasons why your extension needs that scope.
This information only adds to the documentation instructing a user to set up the Service Account. The scopes aren’t added automatically just because they are listed in response to this filter.
Example:
public function gad_gather_serviceacct_reqs($reqs_array) { $reqs_array[] = array('Google Apps Directory', array('https://www.googleapis.com/auth/admin.directory.user.readonly' => 'Search for user information in your domain')); return $reqs_array; } add_filter('gal_gather_serviceacct_reqs', 'gad_gather_serviceacct_reqs' );
Login Hooks
Google Apps Login hooks
Action: gal_user_loggedin
This action is fired whenever a user is successfully authenticated into WordPress using Google Login. You could use it to obtain and save information such as profile photo URL.
Params:
$wp_user – the WP_User object that just logged into WordPress (via Google auth) – note this could have been created by the plugin just now
$google_userinfo – an object holding the raw profile data direct from Google
$wp_userisnew – boolean set to true if the WP_User has just been created on this login; false if the WP user already existed
$google_client is a Google client library object that you could use to make further Google calls
$google_oauth2service – a Google object used to fetch the profile data for GAL plugin
Return:
Void (nothing)
Example:
function my_google_user_loggedin( $wp_user, $google_userinfo, $wp_userisnew, $google_client, $google_oauth2service ) { /* google_userinfo object example: "id": "115886881859296909934", "email": "[email protected]", "verified_email": true, "name": "Dan Lester", "given_name": "Dan", "family_name": "Lester", "link": "https://plus.google.com/115886881859296909934", "picture": "https://lh3.googleusercontent.com/-r4WThnaSX8o/AAAAAAAAAAI/AAAAAAAAABE/pEJQwH5wyqM/photo.jpg", "gender": "male", "locale": "en-GB", "hd": "mycompany.com" */ // Do something with the data error_log("User just logged in with WordPress account ".$wp_user->ID." bringing Google user id ".$google_userinfo->id); error_log("User is ".( $wp_userisnew ? "brand new" : "old")); // Save picture URL update_user_meta( $wp_user->ID, 'user_avatar', $google_userinfo->picture ); } add_action('gal_user_loggedin', 'my_google_user_loggedin', 10, 5);
Filter: gal_login_url – versions 2.8.11+
The Login plugin applies this filter to the login URL it calculates for your site, allowing you to change the ‘callback’ URL that it passes to Google’s login flow. Normally that is /wp-login.php on your site. You might want to change it if you find that the plugin determines an incorrect URL as the callback – for example if another custom login plugin tries to convince all other plugins that its own custom login page (perhaps at /login) is the real URL.
Params:
$login_url – the login URL that the plugin has calculated.
Return:
String – the URL that you want to use to represent the login page instead. Return $login_url for no change.
Example:
function my_gal_login_url($login_url) { return 'https://mysite.com/login'; } add_filter('gal_login_url', 'my_gal_login_url', 10, 1);
Filter: gal_login_button_text – versions 2.8.17+
Filter gal_login_button_text allows you to specify the text displayed on the ‘Login with Google’ button displayed on the WordPress login page. This will work in all versions of the plugin, but in Premium/Enterprise versions it is also possible for an admin to set the button text in Settings, and that will always take priority if set.
Params:
$login_button_text – the default button text.
Return:
String – the button text that you want to use instead. Return $login_button_text for no change.
Example:
function my_gal_login_button_text($login_button_text) { return 'Click Here to Login'; } add_filter('gal_login_button_text', 'my_gal_login_button_text', 10, 1);
Filter: gal_set_login_cookie – versions 2.9.7+
Filter gal_set_login_cookie allows you to specify whether the plugin should set the wordpress_google_apps_login cookie on the current request. By default, the cookie is set on any request if it doesn’t already exist. However, it is normally only absolutely necessary to update this on requests to the wp-login.php page in most setups.
The default scenario could affect caching behavior for some web servers, potentially causing all pages to be generated dynamically every time.
Params:
$dosetcookie – whether to set the cookie or not (boolean).
Return:
$dosetcookie – boolean value whether to set cookie or not.
Example:
function my_gal_set_login_cookie($dosetcookie) { // Only set cookie on wp-login.php page return $GLOBALS['pagenow'] == 'wp-login.php'; } add_filter('gal_set_login_cookie', 'my_gal_set_login_cookie');
Filter: gal_sanitize_username – Enterprise/Premium plugin 2.8.6+ only
The Login plugin applies this filter to allow your extension to modify the username of an automatically created user when they first attempt to Login with Google.
Params:
$username – The default username which will normally be the email address of the user
$userinfo – An array containing details from the user’s Google profile (e.g. name, given_name, family_name)
Return:
String – the username that you would like for the user. This should be a unique username in your WordPress site.
Example:
function my_gal_sanitize_username($username, $userinfo) { $parts = explode("@", $username); if (count($parts) == 2) { $username = $parts[0]; /* Just return the bit before the domain name */ /*- e.g. [email protected] becomes dan.lester */ } return $username; } add_filter('gal_sanitize_username', 'my_gal_sanitize_username', 10, 2);
Note: please see the gal_pre_create_new_user to modify more fields than just the username.
Filter: gal_pre_create_new_user – Enterprise/Premium plugin 2.9.6+ only
The Login plugin applies this filter to allow your extension to modify the WordPress userdata of an automatically created user when they first attempt to Login with Google. This means the data that is passed to the WordPress function wp_insert_user to create the user.
Params:
$wpuserdata – The userdata to be passed to wp_insert_user. The gal_sanitize_username filter will have already been applied.
$userinfo – An array containing details from the user’s Google profile (e.g. name, given_name, family_name)
Return:
$wpuserdata – the userdata to be used to create the WordPress user, or a WP_Error object to abort creation of the user.
Example:
function my_gal_pre_create_new_user($wpuserdata, $userinfo) { if ($wpuserdata['first_name'] == 'Dan') { return new WP_Error("NODAN", "We do not allow people called Dan on this site."); } return $wpuserdata; } add_filter('gal_pre_create_new_user', 'my_gal_pre_create_new_user', 10, 2);
Action: gal_post_create_new_user – Enterprise/Premium plugin 2.9.6+ only
The Login plugin calls this hook to inform your extension after it automatically created user when they first attempted to Login with Google.
Params:
$wpuserdata – The userdata that was passed to wp_insert_user.
$userinfo – An array containing details from the user’s Google profile (e.g. name, given_name, family_name)
$user_id – The user’s ID in WordPress
Example:
function my_gal_post_create_new_user($wpuserdata, $userinfo, $user_id) { // Record that the user was auto-created by the plugin add_user_meta( $user_id, 'is_a_google_user', true ); } add_filter('gal_post_create_new_user', 'my_gal_post_create_new_user', 10, 3);
Filter: gal_user_new_role – Enterprise plugin only
The Login plugin applies this filter to allow your extension to change the desired role for a user when Google Groups (or email addresses) are causing the plugin to change the role.
Params:
$want_role – the role that the plugin wants to set
$user – WP_User object of the user whose role is to be set
$blogid – The blog ID (only really relevant on multisite installations)
$is_user_member – boolean specifying whether user is already a member of this blog (only really relevant for multisite – on single site this will always be true)
$in_groups – dictionary with keys showing email addresses of Google Groups of which the user is a member (including the faux Group consisting of the user’s own email address); each key maps simply to the boolean value true
For example, if the user has email address [email protected], $in_groups may equal: Array( ‘[email protected]’ => true, ‘[email protected]’ => true, ‘[email protected]’ => true )
Return:
String – the default should be $want_role if you don’t want to affect the outcome, and want the plugin to proceed with the role change as intended.
Return empty string ” to remove all privileges from the blog for the user.
Example:
function my_user_new_role($want_role, $user, $blogid, $is_user_member, $in_groups) { if ($blogid == 4 && $user->ID != 1) { // No-one should have any privileges on sub-blog 4 except user with ID 1 return ''; } return $want_role; } add_filter('gal_user_new_role', 'my_user_new_role', 10, 5);
Filter: gal_user_role_changed – Enterprise plugin only
The Login plugin fires this hook to notify that the user role has been changed (for a particular blog). Contrast this with the previous filter gal_user_new_role that allows you to alter the desired role before the role is set. Otherwise, the parameters are basically the same as that filter.
Params:
$want_role – the role that the plugin has set, empty string to mean no access.
$user – WP_User object of the user whose role was set
$blogid – The blog ID (only really relevant on multisite installations)
$is_user_member – boolean specifying whether user was already a member of this blog (only really relevant for multisite – on single site this will always be true)
$in_groups – dictionary with keys showing email addresses of Google Groups of which the user is a member (including the faux Group consisting of the user’s own email address); each key maps simply to the boolean value true (see gal_user_new_role for details).
Example:
Add secondary roles to the user based on group membership.
function dsl_my_user_role_changed($want_role, $user, $blogid, $is_user_member, $in_groups) { $extraroles = array('[email protected]' => 'payingcustomer', '[email protected]' => 'courserep'); $extra_roles = array_values(array_intersect_key($extraroles, $in_groups)); if (is_multisite()) { switch_to_blog($blogid); $blog_user = get_userdata( $user->ID ); foreach ( $extra_roles as $role ) { $user->add_role($role); } restore_current_blog(); } else { foreach ( $extra_roles as $role ) { $user->add_role($role); } } } add_action('gal_user_role_changed', 'dsl_my_user_role_changed', 10, 5);
Accessing Config
Accessing core Google configuration
Filter: gal_gather_scopes
The Login plugin applies this filter to allow your extension to instruct it to obtain extra Google authorization scopes (permissions) when users login to via Google. For example, you can tell the Login plugin to ask for authorization to access the user’s Drive, in addition to the profile permissions it always asks for.
Params:
$scopes – Array of scopes from other plugins.
Return:
Array of scopes, adding your own scopes first if needed. Do not worry about potential duplicates – the plugin takes care of that.
Example:
function my_gather_scopes($scopes) { return array_merge($scopes, Array('https://www.googleapis.com/auth/drive.readonly', 'https://www.googleapis.com/auth/drive.file'); } add_filter('gal_gather_scopes', 'my_gather_scopes' );
Filter: gal_get_clientid
This is a filter implemented by the Login plugin that your extension might call. Your extension is unlikely to implement this filter itself, but may want to make use of its return value.
This obtains the Google Cloud Console Project’s Client ID from the Login plugin – the Client ID is the code that the admin enters when they first set up the Login plugin.
You may want to pass this to your own Javascript code in order to call Google APIs on the browser. The Drive plugin does this – see its source code.
Params:
Empty string (ignored)
Returns:
String containing Client ID or empty string if Login plugin is not yet configured.
Example:
$clientid = apply_filters('gal_get_clientid', '');
Filter: gal_client_config_ini
The Login plugin applies this filter to allow your extension to specify a filesystem path to an INI file OR a GoogleGAL_Config object to pass to Google’s client library on instantiation
Params:
None
Return:
String – full filesystem path to your INI file. See client library source code in core/Google/Client.php to understand the format and options for this INI file.
GoogleGAL_Config object – an instance of this config object class.
Null – default, don’t pass any configuration file.
Example 1 – config in an ini-file instructing Google client library to not cache requests in the filesystem at all:
function my_client_config_ini($inipath) { if (!class_exists('GoogleGAL_Cache_Null')) { require_once '/var/www/~username/wp/wp-content/plugins/googleappslogin-enterprise/core/Google/Cache/Null.php'; /* <--- you will need to enter the full path here */ } return '/var/ini/my_google_client_library_settings.ini'; } add_filter('gal_client_config_ini', 'my_client_config_ini', 10, 1);
And the my_google_client_library_settings.ini file would contain just one line:
cache_class = GoogleGAL_Cache_Null
Example 2 - providing a custom config object that supplies Proxy options for calling the Google servers:
function my_client_config_ini($inipath) { if (!class_exists('GoogleGAL_Config') || !class_exists('GoogleGAL_IO_Curl')) { return $inipath; } if (!class_exists('GoogleGAL_IO_Curl_My')) { class GoogleGAL_IO_Curl_My extends GoogleGAL_IO_Curl { public function __construct(GoogleGAL_Client $client) { parent::__construct($client); $this->setOptions(array( CURLOPT_PROXY => 'https://proxy.url/', CURLOPT_PROXYUSERPWD => 'userpwd' )); } } } $conf = new GoogleGAL_Config(); $conf->setIoClass('GoogleGAL_IO_Curl_My'); return $conf; } add_filter('gal_client_config_ini', 'my_client_config_ini', 10, 1);
Overview
Once you have installed Google Apps Login, your developers can use it as a ‘platform’ allowing them (or other third-party plugins) to centralize all Google API calls and easily add Google functionality.
Your WordPress site appears to a Google account as one unified ‘web application’, making it more secure and easier to manage. It also means that extensions do not need any setup of their own once Google Apps Login is installed.
A popular example extension is our Google Drive Embedder plugin which allows users to browse for Google Drive documents to embed directly in their posts or pages.
Please get in touch if you would like to build on our platform – we love to hear what developers are making, and we may also be able to add extra relevant hooks to help you out. Email us.
The documentation that follows assumes you are adding code to your existing WordPress installation or to your own plugin, and that the basic, premium, or enterprise version of Google Apps Login is installed. For more details on WordPress hooks (actions and filters) please see here.