API Platform

All-In-One Intranet

Installation

To install the free version of All-In-One Intranet, go to your WordPress Plugins page, click Add New, then search for “All-In-One Intranet”. Click to install, then Activate once installed.

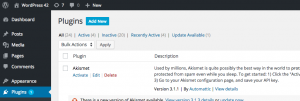
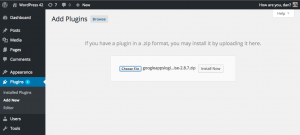
To install the premium version, you should have been given a ZIP file when you purchased the product. Go to your WordPress Plugins page, click Add New and then Upload Plugin. Locate the ZIP file on your computer, then Install Now. Once installed, click Activate.

If you are running a Multisite version of WordPress, you will need to use the Premium version of the plugin, and you will need to Network Activate it (rather than Activate on individual sub-blogs).

Configuration

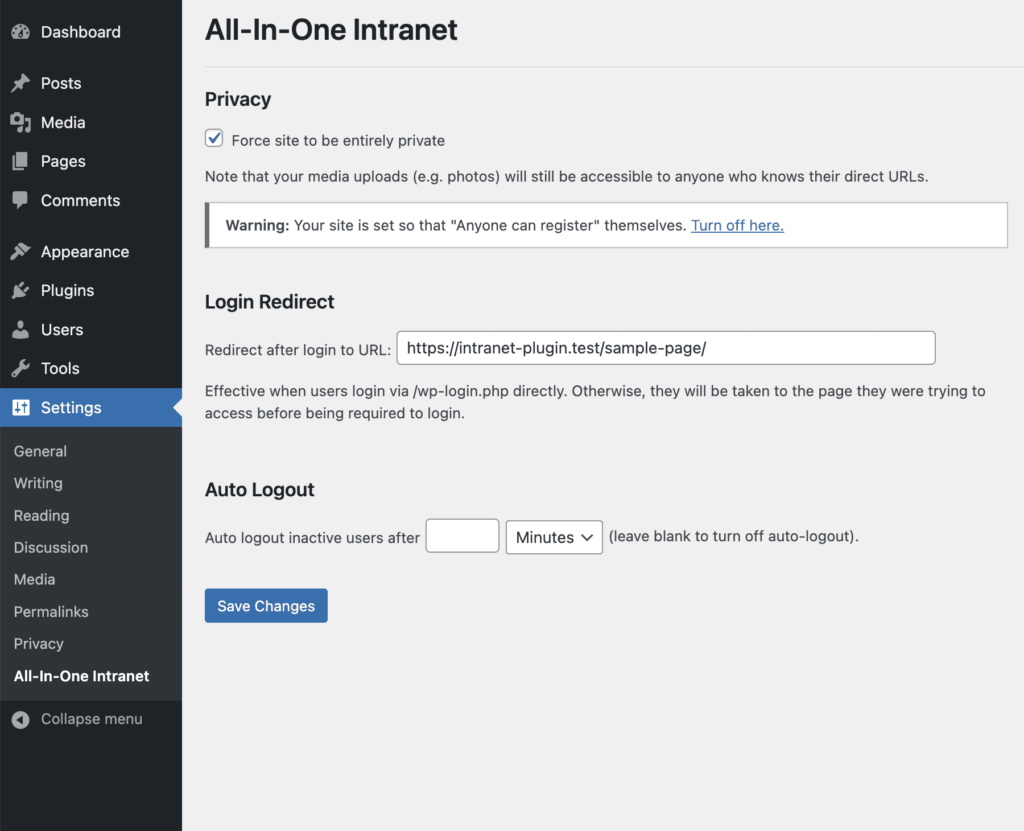
In your WordPress admin, go to Settings -> All-In-One Intranet. These are the settings on a non-multisite installation.

All In One Intranet single site settings

Force site to be entirely private

To make your entire site private, ensure ‘Force site to be entirely private’ is checked and then Save Changes.

From that point on, anyone trying to access any page of your site will need to be logged in as a user in WordPress. If they are not logged in, they will be redirected to the WordPress login page /wp-login.php in order to login. If they login successfully, they will then be taken to the page they were originally trying to view.

Login Redirect

Enter a URL in this box to ensure that users who go directly to /wp-login.php are subsequently redirected to that page after successful authentication. Otherwise, the WordPress default is to send them to their WordPress profile page (the same as Users -> Your Profile in the admin panel). That’s generally not very helpful for an intranet – you are more likely to want them to go to the main front-end of your site, perhaps the homepage.

Please note the Login Redirect only applies if users access the site via /wp-login.php directly. If they initially aim for another page (e.g. https://intranet.mycompany.com/page1/) then either they are already logged in so see the page fine, or they are sent to the login page to authenticate – after which they will be sent on to /page1/ since that is where they were aiming in the first place.

Auto Logout

If you specify a time period (e.g. 2 hours) then any logged-in user will be automatically logged out if they don’t use the site for that length of time. This protects your site if users leave their computer unattended, or access it on a shared computer.

Note that your WordPress configuration may also have its own session length that may also apply. (e.g. WordPress may log you out after 24 hours even if the plugin’s Auto Logout feature is turned off by setting the box to blank.)

Multisite Configuration

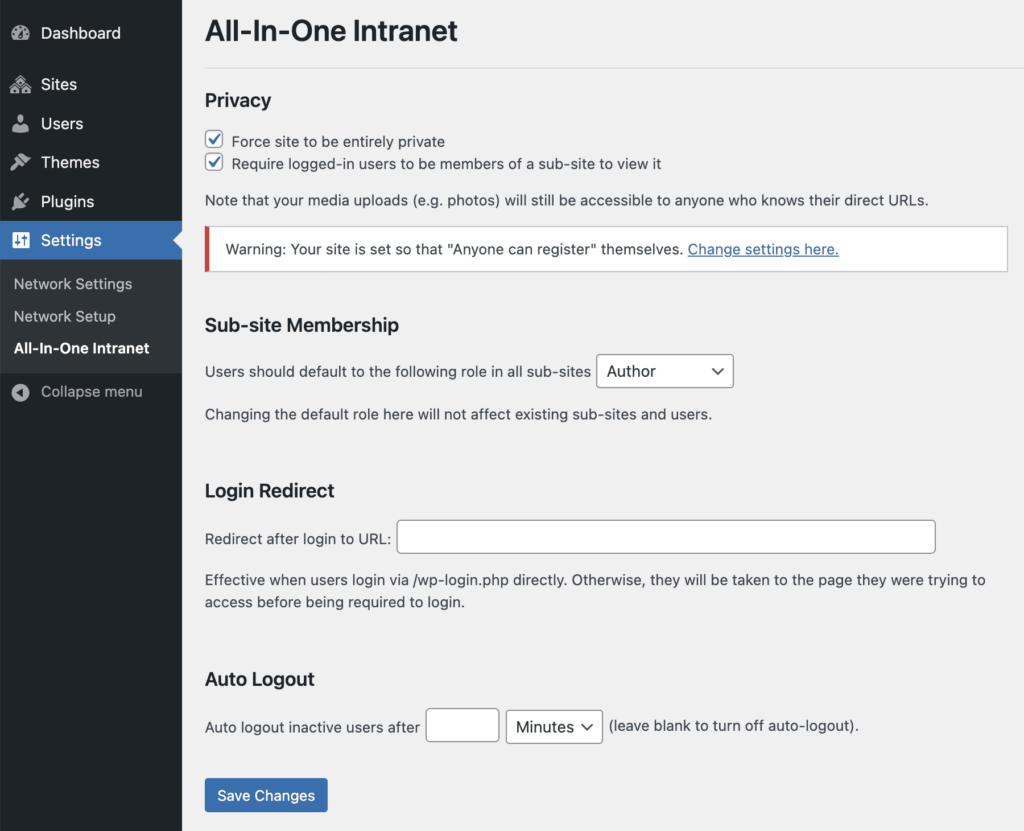
If you installed the Premium version on a WordPress Multisite then you will see some extra options that apply to the multisite setup. Remember, you will have Network Activated the plugin at the top level of your site.

All In One Intranet Multisite settings

Most settings are similar to the non-multisite version described above, but there is some extra behavior to consider.

Privacy

If you only have ‘Force site to be entirely private’ checked (and ‘Require logged-in users to be members of a sub-site to view it’ unchecked) then as long as a user is logged in to WordPress they will be able to see every page of your site, including any sub-sites, regardless of their membership status of those sub-sites.

If you also check ‘Require logged-in users to be members of a sub-site to view it’ then the privacy will be tighter – users will also have to be assigned as members of any sub-site in order to view its content.

Users can be assigned as members manually as usual in WordPress, via the admin panel, or this can be automated for new sub-sites and new users via the following feature.

Sub-site Membership

The WordPress default is that new users should not be assigned to any sub-sites when they are created. Member assignment is done manually.

However, you can set ‘Users should default to the following role in all sub-sites’ to a role (other than ‘–None–‘) and then any new users will be automatically added as members to all sub-sites (with the specified role in each site).

Note that in WordPress, it is possible for a user to be a member of only some sub-sites, and at a completely different role in each of them – role/membership of a sub-site is independent of other sub-sites.

When new sub-blogs are created, existing WordPress users will be assigned as members to that sub-blog under the role listed here too.

This is useful if your intranet is designed to be full access for everyone in your company and the multisite feature is mainly used to help organize content across many disciplines. Therefore you will want everyone in the company to have the same role across all sub-sites – you are effectively ignoring the boundary between sub-sites other than to help you structure the site.

On the other hand, if your multisite use is designed to separate disciplines – e.g. your marketing department has their own sub-site that should only be accessible to the marketing department, and in turn those users should not be able to see the research sub-site, then you may want to find a different way to manage sub-site membership.

Directory Table

The Enterprise version of Google Apps Directory allows you to display a table of your Google Apps domain’s users, or specific OrgUnits within that.

Shortcode

Here is an example shortcode you would place on the WordPress page where you want the table:

[google-apps-directory-table]

or with more configuration parameters (explained below):

[google-apps-directory-table orgunitpath="/My School/Users/Staff" pagesize="20" search="on" columns="familyName:Last, givenName:First Name, primaryEmail, phone,org_title,org_department" sort="familyName"]

See our demo table to understand how it might appear.

Parameters

orgunitpath allows you to specify an OrgUnit path so that data is only shown for that sub-OU. Default “/”. You can join multiple orgunitpaths through a semicolon. For example:

orgunitpath="/School1/Staff;/School2/Staff"

This will show all users in either of the listed sub-OUs.

pagesize allows you to specify how many results should be displayed in the table before you have to ‘next/prev’ to see more. Note this does not affect the amount of data fetched in the ajax call – all results for the orgunitpath are returned at once, so pagesize only affects the actual display in the browser. pagesize=0 turns paging off completely.

search = on (otherwise “off”) places a ‘filter’ box above the results so you can display only matching rows within the existing results set.

columns allows you to specify which columns (and in which order) you would like. Possible comma-separated values are: primaryEmail, fullName, givenName, familyName, thumbnailPhotoUrl, phone, org_department, org_title, org_location, address_formatted, org_location, home_location, org_phone, mobile.

Within that list, a semicolon allows you to specify a different heading to be displayed for the user if you don’t like our default. E.g. “phone:Extension” if you prefer the column heading to show “Extension” instead of our default “Phone”.

Example: columns=”fullName,primaryEmail: Email Address” – this will display users’ full names in one column and email address in another; the column name for email will be ‘Email Address’ instead of our default ‘Email’.

Default for columns parameter is just columns=”primaryEmail,givenName,familyName”

sort allows you to specify which column the data should be sorted by. Use a valid column name from the list given under ‘columns’ previously. Add a minus sign for reverse sort, e.g. sort=”-familyName”.

department filters the results to show only users who match the department specified. e.g. department=”Sales”

hidebehindtext – if a text string is specified, this will be displayed in place of the full table. When clicked, it opens up the table and loads the data if not already available. Used in conjunction with loadimmediately=”false” this can save loading up all tables on the page when first loaded, so is particularly helpful when you want to display multiple tables on one page – e.g. one per department. See Displaying Multiple Tables.

loadimmediately is a parameter designed to suit ‘tabbed’ pages where you don’t want the directory to display immediately. Default is on, so the data is loaded as soon as the page loads. If you try adding multiple shortcodes to your page, one for each orgunitpath, you may find this is a lot of data to load immediately. Instead, you can have each shortcode inside its own tab that closed initially, and with the parameter loadimmediately=”off”. Then you can add your own Javascript code to call something like this when a tab opens:

$(‘#tabid1 .gad-google-apps-directory-table’).gadGoogleAppsDirectoryListing();

where tabid1 is the CSS ID of your tab.

Alternatively, you can use the ‘hidebehindtext’ parameter so that the table data will be loaded and displayed only when the user clicks on the text you have provided. See Displaying Multiple Tables.

Security for OrgUnits

By default, you will be able to use this shortcode to display all users, or any orgunitpaths. Other page editors may also be able to write this shortcode into their pages, so it would be possible to obtain information on any sub-OUs.

This may not always be desirable – for example, if your Google Apps domain represents a school, you may want a directory of your staff to be made public, but you do not want your students’ information to be obtained by anyone at all.

In this situation, of course you would use the orgunitpath parameter to display only the staff. E.g. orgunitpath="/School1/Staff"
But you still risk someone else entering the shortcode with the students on display: orgunitpath="/School1/Students"

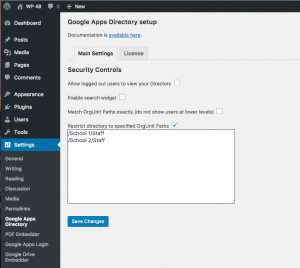
To prevent this, you can check the option ‘Restrict directory to specified OrgUnit Paths’ in the Main Settings tab of Settings -> Google Apps Directory. In the associated text box, enter all orgunitpaths that should be allowed – in this case, only the Staff orgunitpaths that you will use in the shortcode, and not the Student paths.

Make sure you do not specify ‘/’ in that list since that would allow an editor to include a shortcode displaying every single member of your domain.

If you have any shortcodes on your site that specify multiple orgunitpaths through the ‘;’ separator, you will also need to enter that into the list of authorized orgunitpaths – as well as listing them separately only if they are also used individually. For example: "/School1/Staff;/School2/Staff"

Match OrgUnit Paths exactly (do not show users at lower levels)

There is a setting ‘Match OrgUnit Paths exactly (do not show users at lower levels)’ in the plugin settings under Settings -> Google Apps Directory. If checked, then the orgunitpath parameter for table embeds will need to match the user’s full OU path exactly to be included in the results.

For example, if orgunitpath=”/Staff” then when the option is unchecked, users will be returned if their OU path starts with “/Staff” – e.g. if their path is /Staff or /Staff/Dept1 or /Staff/Dept2 etc. When checked, the results from /Staff/Dept1 and /Staff/Dept2 will be eliminated – the OU path must match “/Staff” exactly.

Displaying Multiple Tables

If you want to display multiple departments in separate tables within the same page, this can be implemented efficiently so that each department table is a ‘tab’ that only opens (and loads) when clicked.

You would use the ‘hidebehindtext’ parameter to specify the ‘tab title’ that will be displayed waiting for the user to click on it. And you would also use the parameter loadimmediately=”false” if you want to ensure that the data is only loaded when needed. With the default, loadimmediately=”true”, all tables’ data on the page will be loaded as soon as the page is loaded.

For example to display sales and marketing departments efficiently, you might use the following two shortcodes on one page:

[google-apps-directory-table department="Sales" hidebehindtext="Our Sales Team" loadimmediately="false"]

[google-apps-directory-table department="Marketing" hidebehindtext="Our Marketing Team" loadimmediately="false"]

Search Widget

Both free and enterprise versions of Google Apps Directory will allow you to add a ‘search widget’ to your site, where visitors can search through your Google Apps directory information to find members of your staff.

Adding the Search Widget

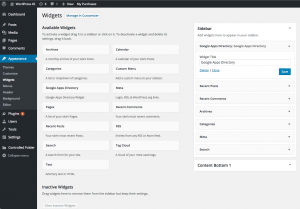
In Appearance -> Widgets within your WordPress admin panel, drag the Google Apps Directory widget to a sidebar of your choice. You can add a title to display above the widget if you wish.

Add Widget

Usage

A search box should now appear in the sidebar on any published pages that include that sidebar in their template.

Enter any text (e.g. a person’s first name) and press enter. The widget will display any matching users from your Google Apps domain – note they don’t need to be WordPress users in order to be found (in fact, WordPress users who are not in your Google Apps domain will not be found).

It is possible to write custom code to add extra fields to the search output – see our API docs.

Widget Security

There is an option to allow only logged-in visitors to be able to utilize the search widget. To change this setting, go to Settings -> Google Apps Directory. There is a setting in the Main Settings tab labelled ‘Allow logged out users to view your Directory’. Check this to allow all users to search; uncheck to restrict usage to only logged in users. Click Save Settings.

In the Enterprise version only, there is also an option labelled ‘Enable search widget’. You can uncheck this to completely remove the widget from your site. This option is provided so that you as admin can ensure other users do not add the search widget to the site (or you might have done so accidentally). This option isn’t relevant in the free version of the plugin since the search widget is the only feature of that plugin – if you don’t want the search widget, you would just deactivate the free plugin!

Installation

Please note that both free and Enterprise versions of Google Apps Directory require you to also have any version of Google Apps Login installed on your site (free, premium, or enterprise), with the Service Account configured.

Enterprise version

If you have bought Google Apps Directory Enterprise, you will have been given a ZIP file to upload. Upload the ZIP file directly in the Plugins section of your WordPress admin.

To do this click ‘Add New’ (at the top of the Plugins page).

Add New

Then ‘Upload Plugin’.

Upload Plugin

And locate the ZIP file.

Choose File

Once installed, click ‘Activate’ on the Enterprise plugin. If you had our free plugin installed, then Deactivate that first (do not Delete until the premium plugin is up and running).

Free version

In your WordPress admin area, go to Plugins. Click Add New, and then search for “Google Apps Directory”. Install from there, and once Activated, go to settings to find the personalized instructions for configuration.

Google Apps Directory

Documentation for the free and enterprise Google Apps Directory plugin.

Google Profile Avatars

This is the documentation for the premium Google Profile Avatars plugin.

Installation

When you purchase the plugin, you will be given a ZIP file to upload. Upload the ZIP file directly in the Plugins section of your WordPress admin.

To do this click ‘Add New’ (at the top of the Plugins page).

Then ‘Upload Plugin’ and locate the ZIP file.

Once installed, click ‘Activate’ on the plugin.

Please note that you will need to be running any version (free, premium, or enterprise) of Google Apps Login for the plugin to work.

Usage

There is no further setup. The plugin works automatically. Whenever a user clicks ‘Login with Google’ to access the WordPress site, the plugin will pick up their Google profile photo if they have one.

From that point on, anywhere on the WordPress site that displays the user’s avatar (e.g. next to their name in a blog post they’ve written), the plugin will display their Google profile photo instead of the WordPress default Gravatar.

If you’re running BuddyPress on your site, the plugin also replaces BuddyPress profile photos with Google profile photos if available.

To see if your user has a Google profile photo imported, you can go to Users -> Your Profile in the WordPress admin panel.

Troubleshooting

JSON key file does not contain all of client_email, client_id, private_key, and type

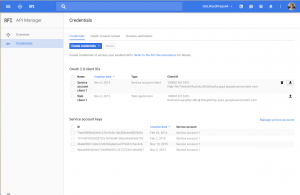
If you see the above error when trying to load your Service Account JSON keyfile into the Service Account section of Settings -> Google Apps Login, most likely you have obtained the wrong JSON file for the Service Account. You have taken it from a different section of the Google Developers Console site.

Maybe you have taken it from the API Manager – by clicking the download icon in the screenshot below.

Incorrect JSON keyfile

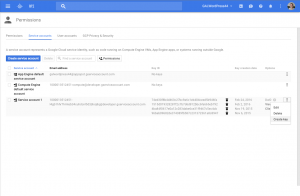
Instead you need to click into the service account, and then click ‘Manage Service Accounts’.

Then you can only obtain the JSON file via the ‘Create Key’ option. This is in the Permissions section:

Correct Service Account JSON keyfile

As always, please get in touch explaining where you’ve got stuck if you have any problems.

Configuration

If you are using certain Google Apps extensions (or the Enterprise version of Google Apps Login), you will need to set up a Service Account. This is an extra step on top of the regular setup (which you should have already followed based on the personalized instructions linked from your WordPress admin panel under Settings -> Google Apps Login – or you can see them here). The Service Account will allow your extension to make calls to Google APIs which require domain-wide permissions rather than just the permissions of the user who is currently logged in.

If in doubt about whether you need a Service Account or not, please just ignore for now, and you can come back later if you discover functionality is missing from your extension.

Please note that Service Account functionality appears to be no longer available for free gmail.com accounts – upgrading to a G Suite account is required.

It will be easiest if you activate your Google Apps extension first before following the steps below – although you can choose to set up a Service Account before those extensions are activated if you want.

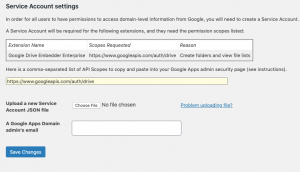
Go to the WordPress admin page and select Settings (appearing on your left side of the screen) Select Google Apps Login from the settings menu. Under the Google Apps Login setup section, the main set up tab will be selected by default. For more clarification please refer to the screenshot given below.

This is the screen where you need to setup your service account.

Please Click on the Google Developers Console.
Select the project you created when you first configured the Google Apps Login plugin from the list.

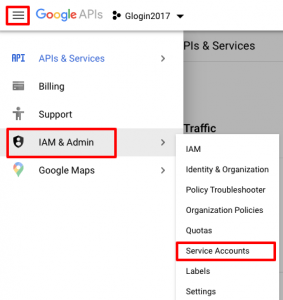
Once you have selected the project, you will have to select IAM & Admin from the top-left menu. Under IAM & Admin, select Service Accounts. Click the Create service account button at the top.

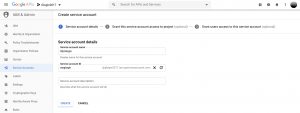
When you click on Service accounts you will get a screen to create a new service account please click on create a service account from the top menu.

You will get a form to create a service account. Enter the service account name of your choice The “Service account ID” would be auto-generated once you create a service account name. You can leave the Service account ID as it is or you can change as per your choice.

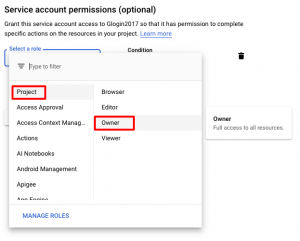
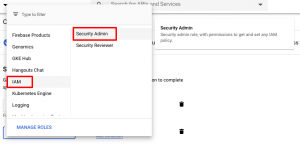
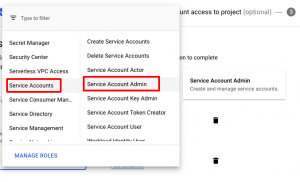
Once you click on create, it will prompt you to enter roles which is an optional choice to enter. But if you want to configure then you can configure the roles as given below.

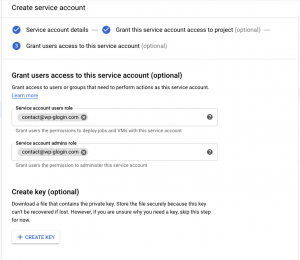
Once you are done with the configuration role, click on the continue. In the next screen, please enter your Gsuite administrator email account in both input boxes. Example shown given below.

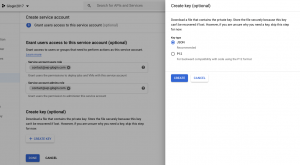
After entering the email address please click on Create key to generate a pop-up, select the JSON option in the pop-up. For clarification, look at the screenshot below.

After selecting JSON, please click on the create button. Your service account will be created and a JSON file will be downloaded. Please check if the extensions Admin SDK, google drive and google calendar API is enabled or not.

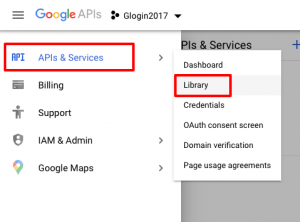
To enable APIs, click on the top menu. Select API & Services. Select Library.

After selecting Library, you will be redirected to a screen where you will be able to search for admin SDK, Google Drive, and Google Calendar API and enable all the three APIs. 

You need to set up the service account created into your WordPress plugin. Please go to your WordPress admin dashboard to upload the JSON key file.

Go back to WordPress and the Main Settings tab of Settings -> Google Apps Login.

Under Service Account settings, click the Browse/Choose file button to upload service account JSON file

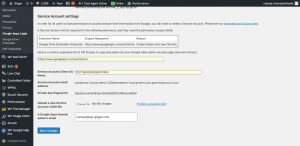
Save changes, if the JSON file has been accepted, the details of your Service Account should be displayed in the Service Account settings area. The information shown should include the ‘Service Account Client ID / Name’ – in a yellow box.

Granting rights for your Service Account to access Groups or Drive etc

Now it time to Grant rights for your Service Account to access Groups or Drive etc.

Finally, as a Google Apps domain administrator, you need to go to your regular Google Apps Domain admin console at admin.google.com (not the Google Developers Console this time).
Please login with Gsuit admin login credentials.

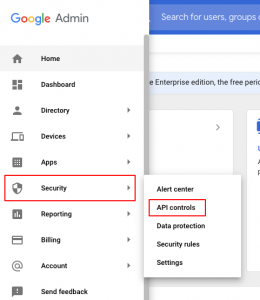
Click on left side menu you will see the list of menus mouse hover on Security you will see the submenu click on API Controls. For more clarification please see the screenshot.

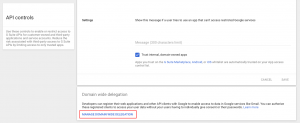
Once you click on API Controls you will be redirected API controls page scroll down and find Domain wide delegation you will see link named “Manage domain wide delegation”.

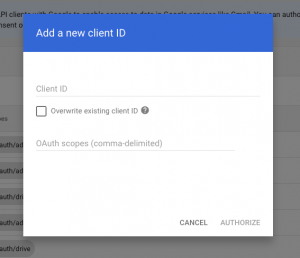
You will be redirected to the page where you can enter Client ID and API scopes by clicking on Add button. For more clarification please see the screenshot given below.


The Client ID of the Service Account you created earlier. E.g. 1234567890123456. You can copy this from the yellow box labeled ‘Service Account Client ID / Name’ in your WordPress settings page. (You would also be able to look it up from the Google Developers Console project page, within the Service Account you created earlier.)

In the box labeled ‘One or More API Scopes,’ copy and paste the scopes list you can see in the other yellow box in the WordPress settings page. For the Enterprise Login plugin, the scopes required should be:

https://www.googleapis.com/auth/admin.directory.group.readonly, https://www.googleapis.com/auth/admin.directory.user.readonly.

The Google Drive Embedder Enterprise version requires the scope https://www.googleapis.com/auth/drive.

The Google Apps Directory extension requires the scope https://www.googleapis.com/auth/admin.directory.user.readonly.

If you have multiple extensions, the yellow box should contain a comma-separated list of all required scopes. For example, if you are using Google Drive Embedder Enterprise and Google Apps Login Enterprise, you will see the following that you need to copy and paste into the ‘One or More API Scopes’ box as one whole line: like given example below

Example : https://www.googleapis.com/auth/admin.directory.group.readonly, https://www.googleapis.com/auth/admin.directory.user.readonly, https://www.googleapis.com/auth/drive

After all settings are done, please click the Authorize button.

Conclusion

Now, your extensions should be able to use your Service Account to do their job. Any problems should be highlighted when those plugins attempt to do their jobs – so check any logs they may provide (e.g. Logs tab in settings for the Enterprise login plugin), or error messages they display on the screen.

Please do not hesitate to get in touch with us if you have any questions at all about Service Accounts or the Google Apps platform in general! Email us.

Service Accounts

Google Apps Login is trusted by thousands of organizations from small businesses to NASDAQ-listed companies and government organizations.

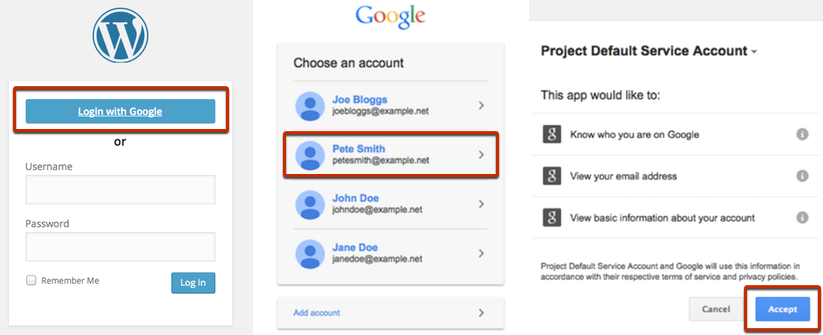
Users click their way through Login via Google (just one click after the first time)

Users click their way through Login via Google (just one click after the first time)


You can try it out by clicking below to auto-create a test account on this site! This will show you the basic Google login process.
Try out Google login

Logging in is only the start – Google Apps Login takes care of all your WordPress user management. Find out more here.

[user_show_avatar]

See [user_first_name] – that was easy!

Your account has been created, and you are now logged in. On your own site, you will specify your Google Apps domain – e.g. mycompany.com – and only users on that domain will be allowed to auto-create accounts.

Logging in is only the start – Google Apps Login takes care of all your WordPress user management.

Find out more


×