Multisite
Advanced instructions for WordPress Multisite installations
By default, all logins need to be submitted via the root site’s wp-login.php page (since that is the only Redirect URL you were asked to submit to Google Developers Console when you first set up the plugin). That should be fine to get you started, so please just try it out, but you may find that users are sometimes redirected to unexpected pages, depending on where on your network of sites they decided to login.
If have a small number of sub-sites, and new sub-sites are not expected to be added often, you might prefer to register additional Redirect URLs with Google for each of your sub-sites, in addition to the root site you were asked to enter when you first configured the plugin.
If you are using ‘domain mapping’ so that your sub-sites are on completely separate domains, you will need to add each site’s login page as its own Redirect URL.
For example, you may end up listing all of https://mywpsite.com/wp-login.php, https://mywpsite.com/subsite1/wp-login.php, and https://mywpsite.com/subsite2/wp-login.php as Redirect URLs in the Google Developers Console.
You will then need to check the box in the Multisite Options section of the plugin’s admin panel labelled Use sub-site specific callback from Google. This will cause all logins submitted to the sub-site they were invoked on.
If you are using the Enterprise version of Google Apps Login, there are further multisite considerations described here.
Advanced Options
Advanced Options
You and your users will be able to use Google Apps Login perfectly fine if you simply ignore the Advanced Options section. However, there are two options, plus an extra little trick, that will allow you to customize the exact login flow as you desire.
Force user to confirm Google permissions every time
If checked, users will have to fully authorize your site to Google every time they login. This may make the login flow clearer for users who are currently logged into exactly one Google account, and also gives them the chance to login to a different Google account instead. However, the login flow is quicker if you leave this unchecked.
Automatically redirect to Google from login page
If checked, all users will be automatically forwarded to the Google login flow when they access the /wp-login.php page. If your users only ever use ‘Login via Google’, this saves them having to click that button on the login page to initiate the process.
Login page redirect override
It is not a setting in itself, but a trick that you may use to override the behavior of the last setting described (i.e. Automatically redirect to Google from login page). Whether or not that setting is checked, you can send users to /wp-login.php?gaautologin=true to ensure the automatic redirect happens. Likewise, you can send users to /wp-login.php?gaautologin=false to ensure the full WordPress login form is displayed, giving them the choice of username/password or ‘Login via Google’, regardless of the Automatic redirect setting.
This can be useful if you want, for example, a link in your sidebar advertising the Google Login functionality as a direct link, without forcing it on all users at all times.
Display ‘Powered By wp-glogin.com’ on Login form
Uncheck this to remove the attribution link on your login page. Of course we are thrilled if you want to spread the word about our product, but it’s no problem if this is not appropriate for your site. It can also be useful for future admins of your site to understand immediately how you have implemented Login with Google, and to come to us for support.
Automatically logout of Google when logging out of WordPress
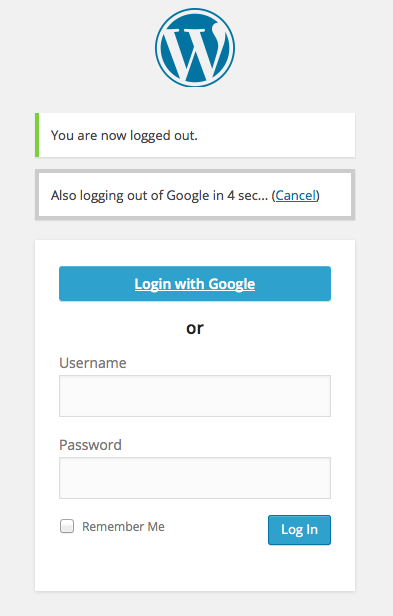
Premium/Enterprise only. When ‘Automatically logout of Google when logging out of WordPress’ is checked, logging out of WordPress returns users to the WordPress login page as usual, indicating they are now logged out. And it also displays a widget counting down from five seconds before it will redirect automatically to the Google logout pages.
If the user wants to remain logged in to Google, they can click the widget’s cancel button before the five seconds are up!
Login button text
Premium/Enterprise only. Enter some text in the box next to ‘Login button text’ to change the text shown in the ‘Login with Google’ button on the WordPress login page. For example, you could change it to say ‘Company Email Login’.
Multisite Options
The Multisite Options section of the plugin’s admin panel contains an option named Use sub-site specific callback from Google. This is explained in our Multisite instructions.
Enterprise Setup
The instructions on this page assume you are using the Enterprise version of Google Apps Login and have already followed the setup steps that apply to all versions, followed by the instructions specific to the Premium (and also Enterprise) version which you can read here. This page explains more about the Enterprise plugin’s granular user role controls.
Setup a Service Account
To ensure all users in your domain can call the Google Groups API, the Enterprise version of Google Apps Login plugin requires you to complete an extra setup step.
If you haven’t already created a Service Account when you configured the plugin, then you will not see the Service Account email address and Private key fingerprint towards the bottom of the Main Settings tab in Settings -> Google Apps Login in your WordPress admin.
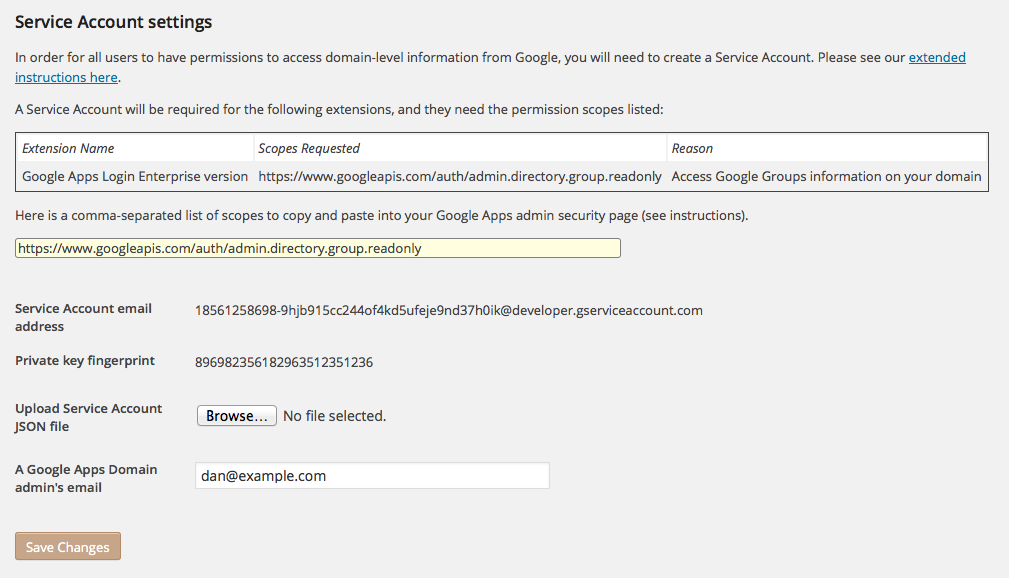
If these fields are not yet completed, follow the instructions to set up a Service Account here.
Mapping Google Groups and OrgUnits to Roles
A key feature of the Enterprise version of the plugin is having greater control over WordPress roles. Please click on the Domain Control tab.

As for the Premium version, you should enter your company’s G Suite (formerly known as Google Apps) domain name in My Google Apps domain, and check Auto-create new users on my domain if that’s the functionality you desire. When users from your G Suite (Google Apps) domain attempt to login to WordPress using “Login with Google”, their accounts will be auto-created if they don’t already exist in WordPress.
The Enterprise Role Mapping Rules section allows us to specify how roles are assigned to those auto-created new users – and, optionally, we can reinforce those role rules every time a user logs in via Google.
Setting up Rules
You can add multiple rules to map from Google Groups or OrgUnits to WordPress roles. Enter the email address of a Google Group, or an OrgUnitPath, and select the desired corresponding role from the dropdown. Above, you can see we want members of the Google Group [email protected] to become Admins in WordPress; and members of the Group [email protected] to become Editors. If the user is in neither of those Groups, then they may become Contributors if they belong to the /HardwareDivision OrgUnitPath (or below – e.g. /HardwareDivision/Mobile). Finally, if they do not match any of the rules they will be assigned the ‘Default Role’ of Subscriber.
There is also a ‘No Access’ option in the role dropdown so that any matching users are denied any usable role in the site.
Adding and Removing Rules
To add an extra rule click the Add Rule button. This will provide an extra empty row for you to enter a new rule.
To remove a rule box, just click the Delete link at the end of that row.
Rules are applied in the order shown in the Domain Control tab, stopping when any match is reached so that the first matching role will be applied. To change the order of the rules you can click and drag the up/down arrow icon at the left-hand side of the rule row that you want to move.
Overriding individual emails
Sometimes, you will want to create very specific rules that aren’t worth the creation of a Google Group. For example, you may want only yourself to be an Admin, but no other members of any Group (or anyone at all) – and it’s not really worth creating a new Group containing only yourself. In that case, you can simply enter an individual email address (e.g. your own) instead of a Group email address, and select the desired role from the dropdown.
Initially, when activated, the plugin will try to set up some rules based on your admin users. These will all be overrides so that admin users remain admins even after the rules are applied. You can remove these if you like, but they are in there as a safety net. If we didn’t put them in to start with, it would be easy just to run a set of blank rules and make all users, say, subscribers – at which point there would be no admins left to fix things!
How rules are applied
It is important to understand that the rules are applied in the order listed on the settings page, and finally the Default role is applied if no other matches are found. Once a rule matches and is applied, the search will stop.
If there are no rule matches, the Default Role will be applied.
In the example in the screenshot above, if a user is member of both developers and marketing groups, they will become an Admin in WordPress because the developers -> Admin rule is listed first.
For individual email addresses, you would normally want to list those first above any Group entries. Otherwise, if the user is also a member of a Group, an earlier Group-based rule could prevent their individual email address rule from matching first.
Check and reset roles on every login
If this is unchecked, the rules are only applied when a new user is auto-created. If you check the box, the rules will be reapplied (e.g. if membership of Google Groups has changed), every time a user logs in using Google.
Note that rules will not be applied if a user logs in using regular WordPress username/password – but you can check the box towards the top of the Domain Control tab if you want to ensure they can’t login that way.
All role changes (or any problems fetching Google Group or OrgUnitPath information) will be listed in the Logs tab of the Google Apps Login -> Settings page.
Note that multisite installations have a couple of extra options on this page – explained here.
Next Steps
Please do not hesitate to get in touch with us if you have any questions at all about the plugin!
You can also find out about Premium/Enterprise Advanced Options and Multisite usage.
Premium Setup
The instructions on this page assume you are using the Premium or Enterprise version of Google Apps Login and have already followed the setup steps that apply to all versions, available here.
License
In Settings -> Google Apps Login (within your WordPress admin panel), click on the License tab. Enter the license key from your purchase email. This will enable automatic update notifications of any future versions of the plugin.
Domain Control
This tab in the admin panel allows you to really harness the extra functionality available in the premium plugin – ensuring your G Suite (formerly Google Apps) userbase is synced to corresponding WordPress user accounts. Enterprise users should read through this section to understand how the Domain Controls work, and then move on to the Enterprise Setup page to learn about the extra granular controls available within the Enterprise version.
If you leave everything in the Domain Control section blank, then any existing WordPress users with a Gmail or G Suite (Google Apps) email address will be able to use ‘Login with Google’ to login to WordPress. If they don’t have an account already set up, then of course they will not gain access. Alternatively, all WordPress users will be able to use their usernames and passwords to login as normal – and that includes Gmail/Google users who choose not to use the ‘Login with Google’ button.
But let’s say you want everyone with an email address on your G Suite domain ‘example.com’ to be able to login to WordPress. The way to enforce this without having to set up every user in WordPress manually is to require everyone to Login with Google, and for the Google Apps Login plugin to auto-create accounts in WordPress for any example.com users who do not yet have accounts.
Enter your G Suite (Google Apps) domain name in the My Google Apps domain box – e.g. “example.com”. (Tip: if you have a few different domains in use, you can list them with a space inbetween, e.g. “example.com altdomain.com” – details here)
Check the Auto-create new users on my domain checkbox.
For now, leave the following checkbox unchecked: Disable WordPress username/password login for my domain.
For the Default role for new Google users dropdown, select a suitable role for any users auto-created via Google Login.
At this point, every valid example.com user has access to a WordPress account, as long as they use Login with Google to access it.
If you think all users who will ‘Login with Google’ will be from your own G Suite domain (e.g. example.com) then check this box: Force Google login to use accounts on my domain (saves user having to select from multiple Google accounts). This will make things easier for your employees if they also have personal Gmail accounts logged-in within the browser – they will no longer have to select between their Google accounts since their corporate account will be selected automatically.
Once you are sure the login and account-creation aspect is working, read the details below to ensure that this is watertight. The problem now is that other unexpected users may also be able to gain access.
Restricting Unauthorized Access
To complete the setup described – where all users with email addresses on example.com should have access to WordPress, but no others should – we need to understand where these potential leaks could come from.
New Registrations
If your WordPress site has not been set up carefully, it may be possible for absolutely anyone on the internet to register for an account! Note this would have been the case even before you set up this Plugin.
To register, these people would go to http://example.com/wp-login.php?action=register or equivalent. To disable this, go in your WordPress admin panel to Settings -> General Settings -> Membership and uncheck Anyone can register.
On the same General Settings page, there will also be a New User Default Role dropdown. If you do want the general public to be able to register then this is the role they will get – you will normally want this at the lowest level of Subscriber. By contrast, users who are auto-created via Google Login will be given the role set separately in the Domain Control section of the Google Apps Login plugin settings, described above.
Ex-employees
Another concern may be what happens if a user leaves the company. You will probably have a process to disable their G Suite account, but do you have to remember to remove them from WordPress? If they are using Login with Google, then of course they will not be able to connect to WordPress if they cannot first get in to their Google account.
So that’s all fine unless they first set and learn the password for their WordPress account. That’s why the Google Apps Login plugin also has an option to ensure your example.com users cannot login to WordPress using a regular username and password.
Back in the WordPress admin panel, go to Settings -> Google Apps Login. The second-to-last checkbox is Disable WordPress username/password login for my domain, and you should set this once you are confident your regular Login with Google access is working fine. You could find yourself locked out of WordPress if you check this box before your plugin configuration is complete.
Please note that any existing WordPress sessions will still be accessible to the ex-employee until they expire – but the user will not be able to login again once sessions have expired.
You can also Completely hide WordPress username and password boxes to ensure there is no confusion for your employees as to how they should login. However, please note that it is still possible for any existing WordPress accounts to login (if they are not on your G Suite domain). Those users can override the hiding of username/password boxes by going to the URL /wp-login.php?gahidewplogin=false.
Existing Registrations
Note that even after you have disabled new registrations for random visitors, and restricted auto-creation to your G Suite domain as above, you may still have existing WordPress users who can access their accounts, and who are not on your Google Apps domain.
The ‘cleanest’ recommendation is to ensure that no such users exist. If you do have a reason to grant access to a non-Google Apps user, then of course just be aware of that and take care if they move on from your organization.
Next Steps
If you are using the Enterprise version of Google Apps Login, find out more about granular Domain Controls here.
If not, you can find out about Premium/Enterprise Advanced Options and Multisite usage.
Installation
Premium/Enterprise version
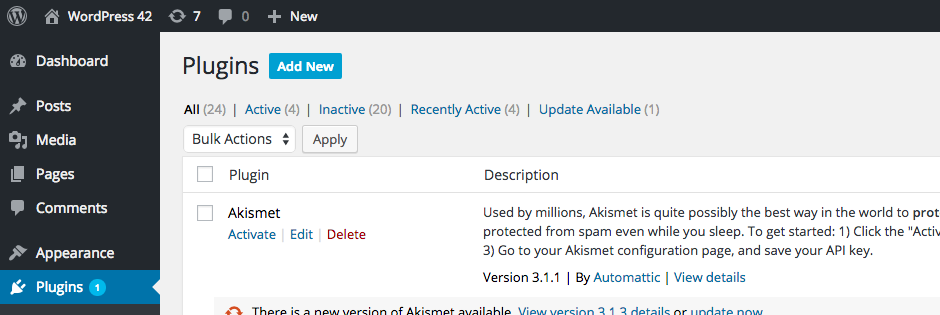
If you have bought Google Apps Login Premium/Enterprise, you will have been given a ZIP file to upload. Upload the ZIP file directly in the Plugins section of your WordPress admin.
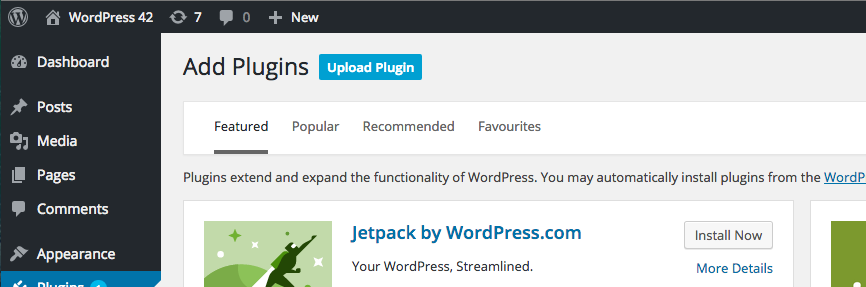
To do this click ‘Add New’ (at the top of the Plugins page).
Then ‘Upload Plugin’.
And locate the ZIP file.
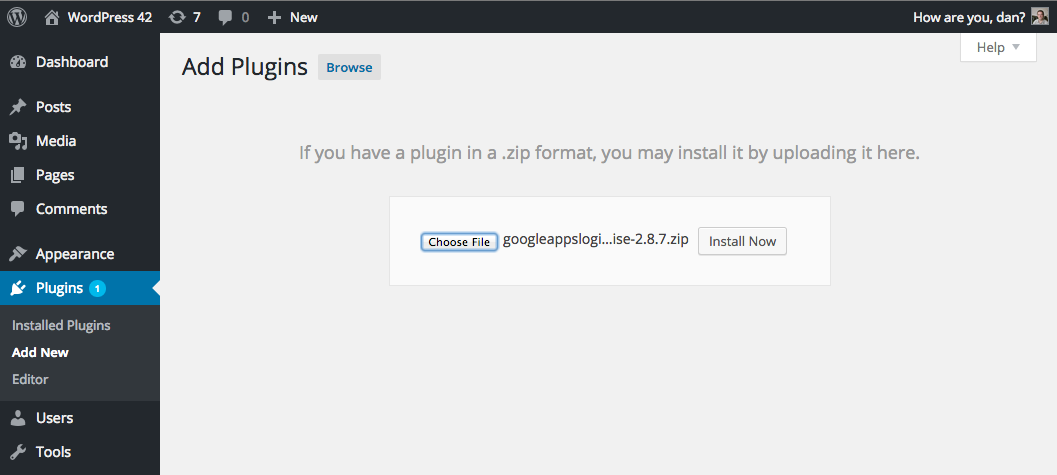
Once installed, click ‘Activate’ on the Premium/Enterprise plugin. If you had our free Basic plugin installed, then Deactivate that first (do not Delete until the premium plugin is up and running).
Then Go to ‘Google Apps Login’ under Settings in your WordPress admin area, where you will need to register your site with Google Cloud Console (unless the plugin has already been able to pull the settings through from the free version of the plugin).
On the control panel there will be a link to personalized instructions. We recommend that you follow the instructions from the control panel, but if you would like to see a preview of the instructions, click here.
Free version
In your WordPress admin area, go to Plugins. Click Add New, and then search for “Login for Google Apps”. Install from there, and once Activated, go to settings to find the personalized instructions for configuration.
Pre-sales Questions
Is login restricted to the Google Apps domain I use to set up the plugin?
No, once you set up the plugin, any WordPress accounts whose email address corresponds to any Google account, whether on a different Google Apps domain or even a personal gmail.com account, will be able to use ‘Login with Google’ to easily connect to your WordPress site.
However, our premium and enterprise plugins have features that greatly simplify your WordPress user management if your WordPress users are mostly on the same Google Apps domain(s). They can automatically create WordPress accounts for your Google Apps users.
We have multiple domains in Google Apps – can we allow users to authenticate from any of them?
Yes, if you have a few different domains – e.g. aliases – then you can specify all of them in the premium or enterprise versions of Google Apps Login.
When you configure the plugin, you will be asked to enter your domain name in a box called ‘My Google Apps Domain’. Simply enter a space-separated list of all your domains, like this:
domain1.com domain2.com domain3.com
You will probably also need to turn off the setting in the Domain Control tab labelled “Force Google login to use accounts on my domain (saves user having to select from multiple Google accounts)” – otherwise only users in the first-listed domain will be able to login.
Please also note that the Enterprise version of Google Apps Login will only be able to obtain Google Group information from the domain on which you originally configured the plugin (i.e. created your Service Account) – but members of those Google Groups can be in any of your domains for the role mapping to still work.
If you have a particularly complicated Google Apps setup, please feel free to get in touch with details so we can advise how you might best configure the plugin.
Does the plugin work on Multisite WordPress?
It is written, tested, and secure for multisite WordPress, both for subdirectories and subdomains, and must be activated network-wide for security reasons.
There are many different possible configurations of multisite WordPress, however, so you must test carefully if you have any other plugins or special setup.
In a multisite setup, you will see an extra option in Settings -> Google Apps Login, named ‘Use sub-site specific callback from Google’. This setting will need to be ON if you are using any domain mapping plugin, and extra Redirect URIs will need to be registered in Google Cloud Console.
Read details in your personalized configuration instructions (linked from the plugin’s Settings page), or see our generic instructions here.
If you are using the Enterprise version of Google Apps Login in a multisite setup, please get in touch with us if you would like understand more about roles and how they can be assigned to users in each subsite.
Can I force a logout from Google whenever users logout from WordPress?
There is a feature in the Premium and Enterprise versions of Google Apps Login labelled ‘Automatically logout of Google when logging out of WordPress’ – it’s in the Advanced settings tab.
When checked, users will be redirected to the Google logout page automatically as soon as they logout of WordPress.
Users can always choose to interrupt this process of course. They need to be happy to logout of Google, but this feature should prevent them from forgetting to do so after using WordPress.
For more information, please see our blog post on the feature.
Licensing
How do I renew my license after 12 months?
We will send you email reminders starting from a month before your license expires. There will be a link in the email to renew directly on our website.
Reminders will also be displayed within your WordPress admin panel, and on the License tab of your plugin’s settings page. Direct renewal links are provided there too.
If you renew a few weeks before your license expires then you won’t lose out – we will add on another 12 months from the date your license expires, not from the date you renew.
By default, all purchases have auto-renewals enabled.
I need to upgrade to a higher license
We are always happy to offer sensible upgrade pricing if you need more sites/users in the future, or if you want to move from Premium to Enterprise versions of your product. We will offer a discount equivalent to the unused portion of your existing support license.
If your purchase email address is a Google account then you should be able to login to our site here: https://wp-glogin.com/wp-login.php
You should be taken to the My Account page, and you can click on ‘View Licenses’ next to your existing purchase. Then there should be a ‘View Upgrades’ link that should allow you to choose a new Unlimited Premium license, with your original purchase price deducted.
If you aren’t able to proceed like this then please get in touch and we will provide you with a direct link to obtain a discount.