If you’re not optimizing and editing the footer of your WordPress site, you could be wasting valuable real estate space on your page.
Social media links in your footer give your reader, customer, or client a last chance to connect with you before they leave your site, which, in turn, gives you an audience for a social media marketing strategy. Newsletter subscription sign-up boxes in your footer do the same thing but give you more repeat access to the eyeballs and inboxes of your audience.
Luckily, it’s easy to edit your footer in WordPress and customize it however you like. We’re going to walk you through the entire process of configuring your footer, with real examples.
Where to Edit Your Footer in WordPress
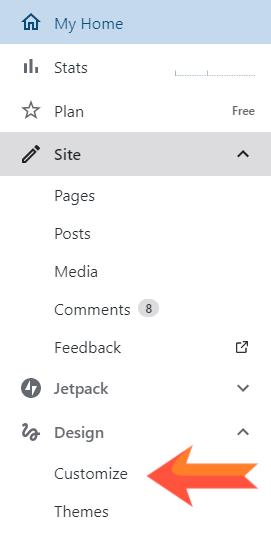
The first step is to log in to your WordPress site, which takes you to your Dashboard. Now, look to the left-hand side of the Dashboard and click on “Design” to open up a quick dropdown.
Click on “Customize” to begin editing your WordPress footer.

This will open up a new menu, right in the same place, on the left-hand side of the Dashboard. This will be in the “Site Identity” section (seen below on the left side of the image). Click on “Widgets,” and a new menu will open.
Now, you’ll see options like “Primary Sidebar” and “Footer Area One,” as depicted on the right side of the image below.
The footer of your WordPress page (the area at the bottom of all of your pages) can be split up into at least three vertical sections. Those sections are Footer Area One, Footer Area Two, and Footer Area Three. You don’t have to fill them all out unless you want to. If you only need one section, that’s fine.

Next, you’ll want to click on “Footer Area One” to edit your WordPress footer.
Customize Your WordPress Footer with Widgets
Once you’ve clicked on the “Footer Area One” text, you’ll be taken to a menu for customizing that particular footer. Now, click on “Add a Widget” (shown below) to open a scrolling menu of widgets that you can add to your footer.
Some of these widgets are complex and allow you to edit your footer exactly how you want (the Custom HTML widget, for instance), and some are extremely simple, letting you just add an image (like Image).

Now, it’s time to select a widget from the dropdown. You can use the search bar at the top right of this menu to make your life easier.
For example’s sake, let’s say you picked the “Links” widget from the list. Now, your “Links” widget menu will pop up, as seen below.
You can add whatever links you like, sort them, and label the entire category as you see fit.

As you’re editing, you’ll actually see a preview of the changes on the right side of the screen. When you’re done editing, click “Done.”
Here’s a look at a footer being edited to add the Links widget:

Then don’t forget to click “Save Changes” at the top of the Footer Area menu.
That’ll look like this, and it’s an extremely important step or all of your work will be for naught:

Now, if you’re looking to fill your footer with more information or additional widgets, repeat the process with Footer Area Two and Footer Area Three.
Adding Multiple Widgets to Your WordPress Footer
It’s a great idea to get as much relevant information into your footer as you can as it gives people the opportunity to learn more about you, to follow your social media sites, or to find a portion of your site they may have missed.
Here’s an example of adding social media follow icons to Footer Area Two, the center of the Footer.
Return to the menu. Click Design > Customize > Widgets, and click Footer Area Two this time. Below, we’ve clicked on “Footer Area Two” for the area and “Social Icons: Follow Us” as the widget.
Then, simply add the URLs of as many social media accounts as you like, clicking “Add an Icon” every time you add a new one.
Then click “Done” when you’re finished, and again, hit the blue “Save Changes” button shown above.

And this is what the footer looks like once you’ve added a second widget. Observe:

Lastly, we’ll cover what it looks like when you add a third footer area, so you know how much space you have to work with before you begin.
We’re going to add a simple “Text” widget, which creates a text field that you can fill with whatever you like. A parting message, copyright or trademark message, or anything you wish.
So, back to the Design > Customize > Widgets and click Footer Area Three this time.
Click “Add a Widget,” as before, and then click “Text” to edit that particular widget, as shown below:

Now, add whatever message you’d like (it can include links and some basic formatting). Then, click “Done” and “Save Changes.” You should see the entire footer in the preview area on the right now.
Here is what our example footer looks like with all three areas filled out and customized:

Obviously, you’ll be using the widgets of your choice and customizing to your style. Just remember to try out different widgets and play around with them before you settle on a final look. There may be a neat widget you haven’t tried before.
Don’t be afraid you’ll ruin anything by customizing or playing with a widget. You can always delete whenever you like and try again or pick a widget you know you like to take its place in your WordPress footer.
Make the Most Out of Your WordPress Layout
Of course, getting your WordPress site fully optimized doesn’t have to end at the footer. If you check out all of the options in the Design > Customize > Widgets menu, you can add similar blocks of content to all of your headers and sidebars as well.
All of these links and new text not only help engage your audience, but they also improve your search engine optimization, which can rank your site higher on Google and get it in front of even more people.

