If you want to know what a slug is in WordPress, take a peek up at the top of this blog. See the URL? It should say “wp-glogin.com/2020/12/optimize-what-slug-wordpress” in the URL bar. That’s this blog’s particular web address, as you know.
But this section of the URL — /optimize-what-slug-wordpress/ — is called the “slug,” and it’s not just for organizational purposes, though it certainly is good for that as well. No, your slug is so important in WordPress because it has a huge effect on your SEO optimization and how Google (and other search engines) grade your site.
We’re going to walk you through why slugs are so important, why you can’t ignore them, and how to optimize the slug of each post and page to maximize your discoverability.
Make your WordPress slug different from your title
Most WordPress sites will auto-generate a slug for you when you create a post: Do not leave this as-is! WordPress just grabs the title of your post or page and throws some dashes in between and calls it a day.
This is a terrible idea if you’re trying to optimize your WordPress site.
Think of it like this: The title of your page or post is your first bite at the SEO apple. Your title is the best source of SEO for search engines, and it’s also often the first and only part of your article a human reader will see.
While you might think duplicating your title in the slug gives you a second bite at the apple, that isn’t necessarily true. Google will disregard the slug if it’s identical to the title, so you’re really not getting any additional juice that way.
Worse, depending on how your WordPress is configured, it might auto-generate a slug for your post that’s just a random string of characters like “wp-glogin.com//2020/12/1u2LF1.” That’s even worse than duplicating your title; you lose a valuable parameter that search engines use to find your content.
A random string of characters in your slug also makes it extremely difficult for a potential reader to figure out what your link is before they click it.
Format the slug properly
Slugs in WordPress must be formatted so they’re easy to read and conform to SEO standard practices.
Choose a slug that contains your keyword, and drop the filler
If your post is titled “10 Tips to Keep Your Cake from Drying out,” then “cake drying out” or “dry cake” might be your keyword.
Instead of your slug being “10-tips-to-keep-your-cake-from-drying-out,“ trying something like ”tips-cake-drying-out“ or ”cake-dry-tips“ or even “tips-prevent-dry-cake.”
This simplifies your URL, makes it shorter for sharing on character-limited mediums (like Twitter), and gives Google a quick and easy keyword to categorize your page or post.
Don’t put a number in the slug
You don’t want the number of a listicle (10 tips) to be in the slug, because you might come back and refresh this post later and add more tips! Or you might come back and decide that one of your tips was a terrible idea and you should cut it.
Sure, you could change the slug, but that would also break every single link pointed toward your post. So you’d lose all of those sweet link referrals.
Plus, numbers are just harder to read than simple words.
Only use words separated by hyphens
This is an easy one, but it’s also an easy one to get wrong. Technically, you can use numbers, and you can separate the words with underscores instead of hyphens, but you shouldn’t.
It’s not the end of the world if you use underscores, but Google’s official URL formatting recommends against it. And numbers are just unnecessary. Keep it simple, keep it clean, and keep it usable.
Edit the slug in your WordPress permalink settings
Customizing your post’s or page’s WordPress URL isn’t hard, but the process isn’t always the same. Depending on what version of WordPress you’re using, whether you’re using the new block setting, or any other theme or developer-related customization you may have made.
We’ll include the two methods below that should work for everyone.
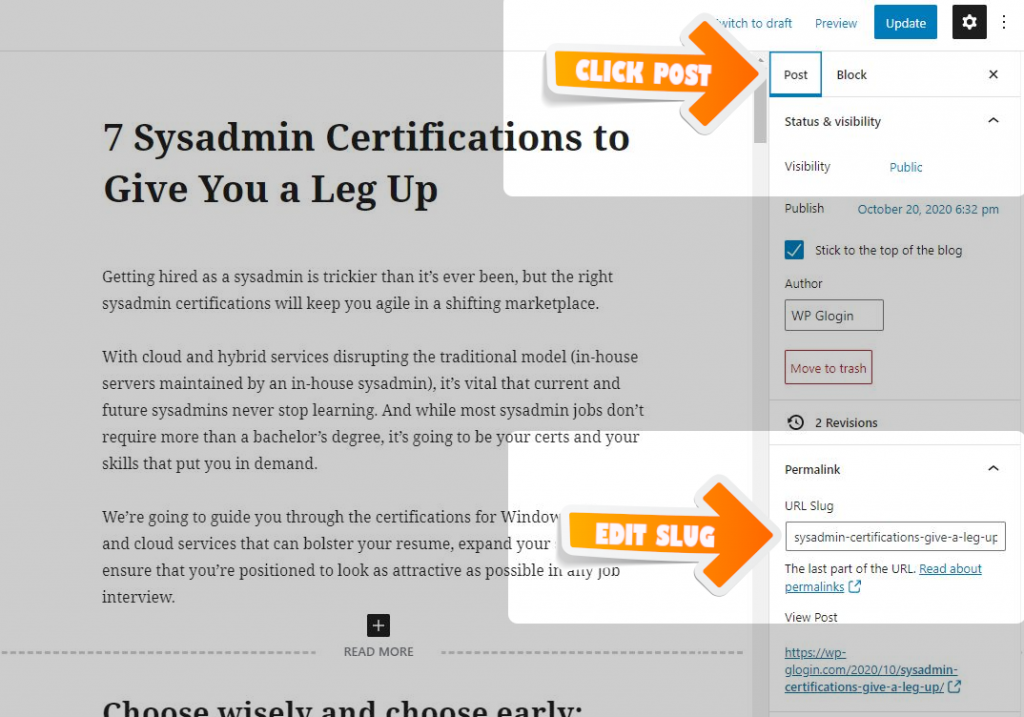
If you’re using the new WordPress “block” setting, you can just go to the “Edit” page of the blog or post. On the right side of the page, click on the “Post” tab (instead of the “Block” tab) and navigate to the Permalink section.
In the Permalink section, you’ll see a text box listing your current URL (the slug for the page or post). Click in the box, and type in the slug you want. Remember to separate each word with a hyphen (-), and omit unnecessary words. Then, click the small blue “Update” button in the upper-right corner when you’re finished.
If you’re having trouble finding your Permalink settings, go to the “All Posts” page on your Dashboard, hover your cursor over the post you want to change, and click on “Quick Edit.”
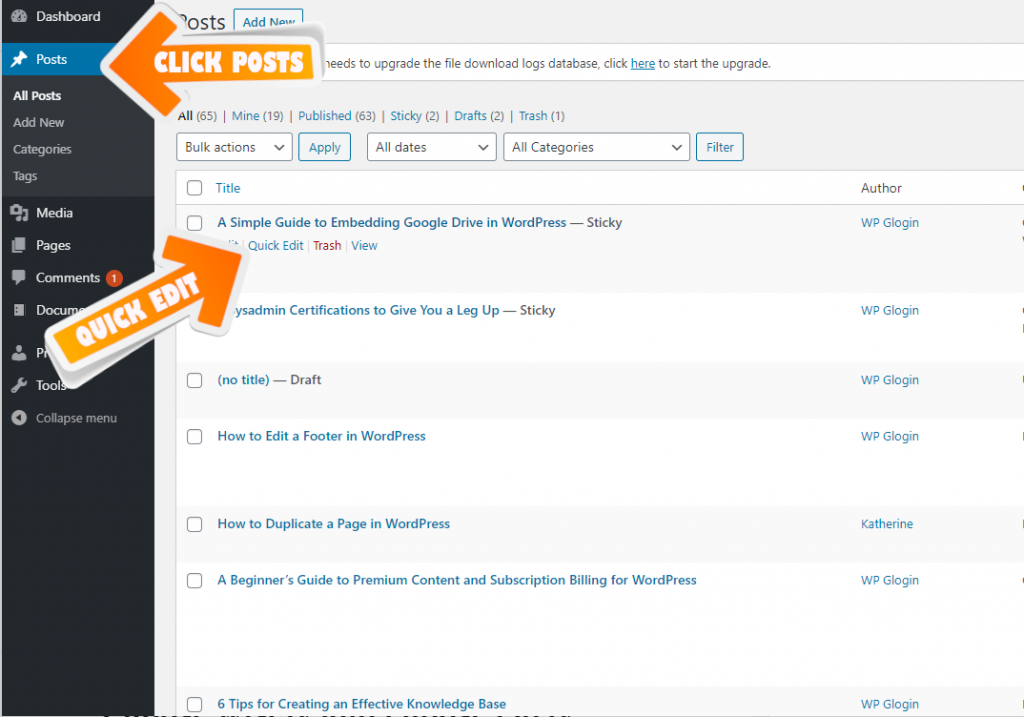
Now, a small section of text fields and drop-downs will appear right on your Dashboard page. These can be used to quickly alter the post. In the text box marked “Slug,” make your changes to the URL, and then Click “Update” on the right when you’re finished.
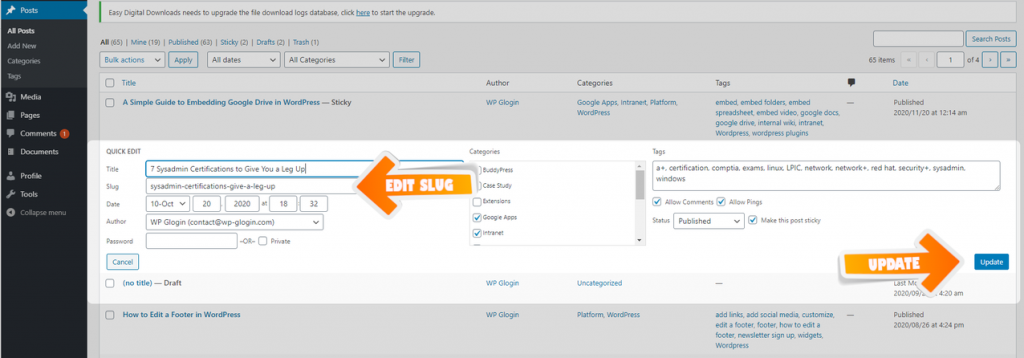
That’s it! You’re done. You’ve officially changed your slug into an SEO-optimized work of art.
Learn more about SEO from Google’s own
If you’d like to learn more about optimizing your site for SEO, you could do a lot worse than skimming Google’s SEO guide. It’s a fantastic starting place for learning best practices, and it’s straight from the source.
